Recording Zoom meetings is an increasingly common need in today’s remote work landscape. Whether you’re conducting interviews, hosting webinars, or facilitating team meetings, having a reliable recording solution is key.
While Zoom offers built-in recording features, using dedicated software like OBS Studio can provide more control, flexibility, and higher-quality output, especially when you’re looking to do some post processing like transcription or uploading them to YouTube.
In this guide, you’ll learn how to set up OBS Studio and use it to record your Zoom meetings with ease.
Table of Contents
What is OBS Studio?
OBS Studio is a powerful, free, and open-source software for video recording and live streaming. Its versatility and extensive features make it a popular choice among content creators, gamers, and professionals alike.
OBS allows you to capture audio and video from multiple sources simultaneously, including your desktop, individual windows, webcams, and microphones. This makes it an ideal tool for recording Zoom meetings, as you can capture the Zoom window along with any other relevant content or inputs.
Why Record Zoom Meetings with OBS?
One of the key advantages of using OBS for Zoom meeting recordings is the level of customization and control it offers. You can fine-tune your video and audio settings, arrange your scene layout, and add additional elements like text overlays or branding.
Here are all the reasons you should consider recording a Zoom meeting with OBS.
- Higher Quality Recordings: OBS allows you to capture Zoom meetings in high resolution and frame rates, resulting in clearer and more professional-looking videos compared to Zoom’s built-in recording feature. This is particularly important if you plan to share the recordings with a wider audience or use them for official purposes.
- Customizable Scene Composition: With OBS, you have the flexibility to arrange your recording layout exactly as you want. You can resize and position the Zoom window, add your own branding or watermarks, include additional video sources like a webcam feed, or incorporate text overlays to highlight key information. While all of this is possible to do in a video editing software as well, OBS speeds things up significantly.
- Multi-source Audio Capture: OBS enables you to record audio from multiple sources simultaneously, such as your microphone, computer audio, and the Zoom meeting itself. This is useful if you want to capture your commentary or narration alongside the meeting audio or if you need to record separate audio tracks for post-production editing. You could even add some background music if you wanted to.
- Compatibility with Various Streaming Platforms: In addition to recording, OBS is widely used for live streaming. If you ever need to stream your Zoom meeting to platforms like YouTube, Twitch, or Facebook Live, you can easily do so using OBS without needing to learn new software.
- Free and Open-source: Unlike some other recording solutions, OBS Studio is completely free to use and distribute. It is also open-source, which means it is continuously being improved by a community of developers and has a wealth of user-created resources and tutorials available online.
Privacy Concerns When Recording Zoom Meetings with OBS
Before you start recording Zoom meetings, it’s important to know that these recordings can raise significant privacy concerns, particularly regarding legal implications.
Depending on your location, recording meetings without explicit consent may be illegal. Different jurisdictions have varying laws about recording conversations. For instance, in some areas, all parties must consent to the recording, while in others, only one party needs to be aware.
When using OBS to record meetings, participants may not be automatically notified, increasing the risk of violating privacy laws.
To mitigate these concerns, it is crucial to obtain verbal consent from all participants before starting the recording. Clearly inform everyone that the meeting will be recorded and ensure they understand the purpose and how the recording will be used.
This practice not only helps in complying with legal requirements but also fosters trust and transparency among participants, ensuring that everyone is comfortable with the recording process.
How to Set Up OBS for Recording Zoom Meetings
Setting up OBS for the first time can be a complicated procedure since there are a lot of details you need to fine-tune. Here’s the quickest way of configuring OBS to record your Zoom meetings.
Step 1: Install OBS Studio
To get started, download the latest version of OBS Studio from the official website. The software is available for Windows, macOS, and Linux.
Once the download is complete, run the installer file and follow the on-screen instructions to install OBS Studio on your computer. The installation process is straightforward and should only take a few minutes.
- Default Settings: During the installation, you can typically stick with the default settings unless you have specific requirements.
- Installation location: Take note of the installation location, as you may need to access this folder later for plugins or custom configurations.
After the installation is complete, launch OBS Studio to begin setting it up for recording your Zoom meetings. The first time you open the software, it may prompt you to run the Auto-Configuration Wizard, which can help optimize your settings based on your system specifications. But, you should probably ignore this since it won’t do too much to help with your use case.
Step 2: Configure Video Settings
After launching OBS Studio, click on “Settings” in the lower right corner of the main window. Navigate to the “Video” tab to adjust your video settings for optimal recording quality.
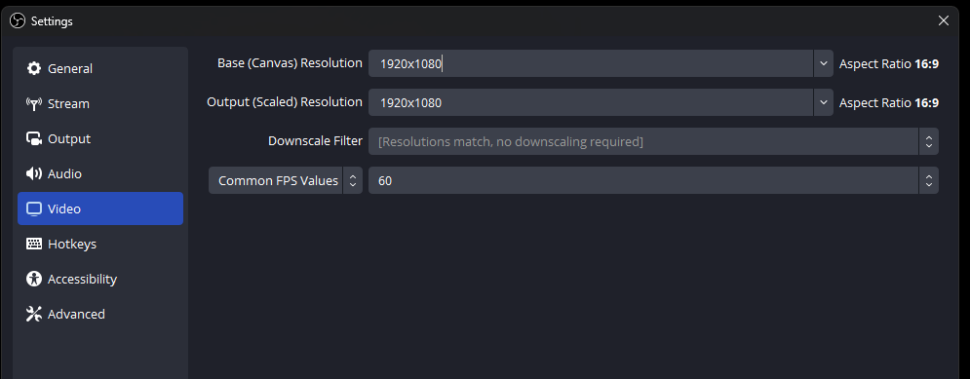
Base (Canvas) Resolution
Set the “Base (Canvas) Resolution” to match your monitor’s resolution. This ensures that OBS captures your Zoom meeting at the highest possible quality. Common resolutions include:
- 1920×1080 (1080p)
- 1280×720 (720p)
- 2560×1440 (1440p)
If you’re not sure what resolution your monitor is, you can go with 1920×1080 since that is the most commonly used resolution.
Output (Scaled) Resolution
The “Output (Scaled) Resolution” determines the final resolution of your recorded video. If you want to maintain the same resolution as your canvas, keep this setting identical to the “Base (Canvas) Resolution.”
However, if you need to reduce the file size or optimize for lower bandwidth, you can scale down the output resolution. For example, if your base resolution is 1920×1080, you might set the output resolution to 1280×720.
Downscale Filter
The “Downscale Filter” setting determines the algorithm used to resize your video if you’ve chosen to scale down the output resolution. “Lanczos” is generally recommended for the best balance between quality and performance.
This feature will be unavailable if your base and output resolution are identical.
Common FPS Values
Set the “Common FPS Values” to match your desired frame rate. Higher frame rates result in smoother video but larger file sizes. 30 FPS is a good standard for most recordings, while 60 FPS is ideal for capturing fast-paced content or creating a more fluid viewing experience.
- 30 FPS: Standard frame rate for most video content, balancing quality and file size.
- 60 FPS: Higher frame rate for smoother motion, ideal for fast-paced scenes or a more polished look.
Click “Apply” and then “OK” to save your video settings. You’re now ready to move on to configuring your audio sources in OBS Studio for recording your Zoom meeting.
Step 3: Set Up Audio Sources
To ensure high-quality audio in your Zoom meeting recording, you need to configure your audio sources in OBS Studio. Here’s how:

- In the main OBS Studio window, locate the “Audio Mixer” section in the bottom center.
- Identify the audio sources you want to capture, such as your microphone and the Zoom meeting audio.
- If your desired audio sources are not listed, click the “+” (plus) button in the “Sources” box and select the appropriate source type, such as “Audio Input Capture” for your microphone or “Audio Output Capture” for the Zoom meeting audio.
- Rename the audio sources to easily identify them, e.g., “Microphone” or “Zoom Audio.”
- Adjust the volume levels for each audio source using the sliders in the “Audio Mixer.” Ensure that the levels are balanced and not clipping (turning red).
- To fine-tune your audio settings, right-click on an audio source in the “Audio Mixer” and select “Filters.” Here, you can add noise suppression, gain, or other effects to improve the audio quality.
It’s important to note that there are two main audio sources you should always have added here: Audio Input Capture for your mic, and Audio Output Capture for your Zoom audio.
Another important note is that if you mute your microphone on Zoom during the meeting, that doesn’t mean that OBS stopped recording your audio. You have to press the volume button next to the blue volume bar under Audio Input Capture to stop your mic from being recorded.
Step 4: Add Zoom Window Capture
To record your Zoom meeting, you need to add the Zoom window as a source in OBS Studio. Follow these steps:
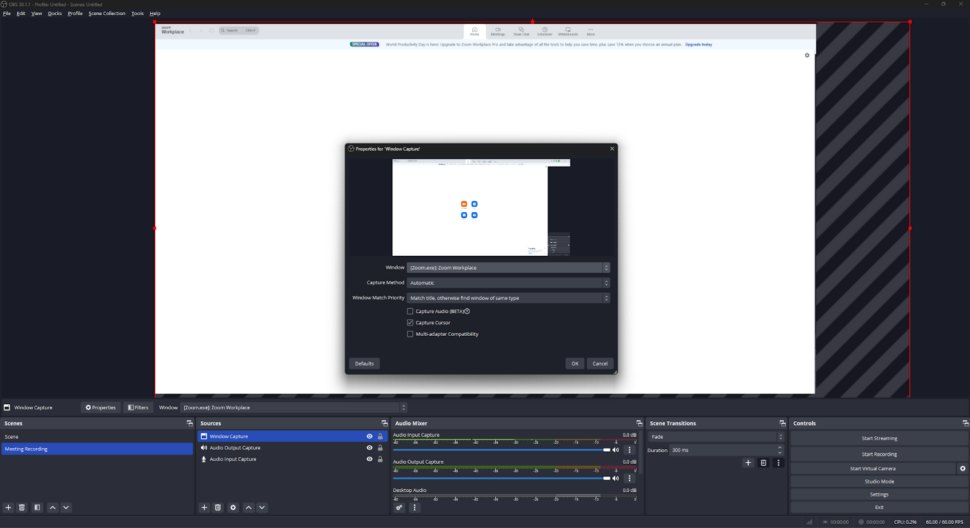
- Open your Zoom meeting and arrange the window as desired.
- In OBS Studio, click the “+” (plus) button in the “Sources” box.
- Select “Window Capture” from the list of sources.
- Name the source (e.g., “Zoom Meeting”) and click “OK.”
- In the “Create/Select Source” window, choose the Zoom meeting window from the “Window” dropdown menu.
- Click “OK” to add the Zoom window capture to your scene.
Tips for capturing your Zoom meeting
- Ensure that the Zoom window is not minimized or covered by other windows during the recording.
- If you have multiple monitors, make sure OBS Studio is capturing the correct monitor where the Zoom window is located.
- Consider adding other sources, such as your webcam video or a presentation, to enhance your recording. Simply repeat the process of adding sources and arranging them in the preview area.
Step 5: Adjust Scene Composition
After adding the Zoom window capture and other desired sources to your OBS Studio scene, it’s time to arrange them for a polished and professional-looking recording and add any elements you need for your recording.
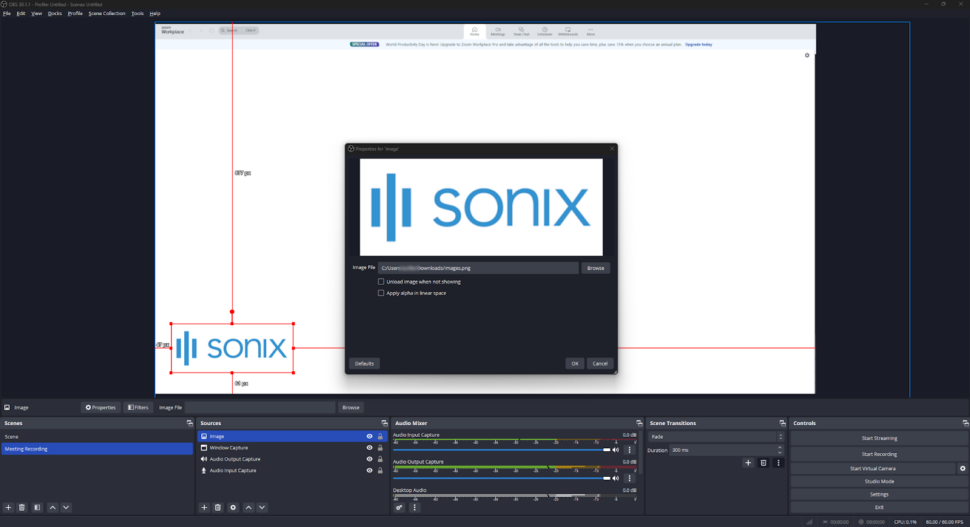
Here are some tips to help you compose your scene effectively:
- Resize and Position Sources: Click and drag the edges of each source in the preview area to resize them. To reposition a source, click and drag it to the desired location. Arrange your sources in a logical and visually appealing layout, such as placing your webcam video in the corner and the Zoom window capture in the center.
- Adjust Source Properties: Right-click on a source in the “Sources” box and select “Properties” to access advanced settings. Here, you can fine-tune aspects like transparency, color correction, and more. Experiment with these settings to achieve the desired look for your recording.
- Use Scene Transitions: OBS Studio offers various transition effects to smoothly switch between scenes. To add a transition, click the “+” (plus) button in the “Scene Transitions” box and choose your preferred effect. Set the transition duration and configure any additional settings to customize the effect.
Creating a custom overlay
To give your Zoom meeting recording a unique and branded look, consider creating a custom overlay. An overlay is a static image or video that appears on top of your other sources, typically used for branding, titles, or graphics. This is a pretty basic overlay, but you can design a unique one based on your requirements.
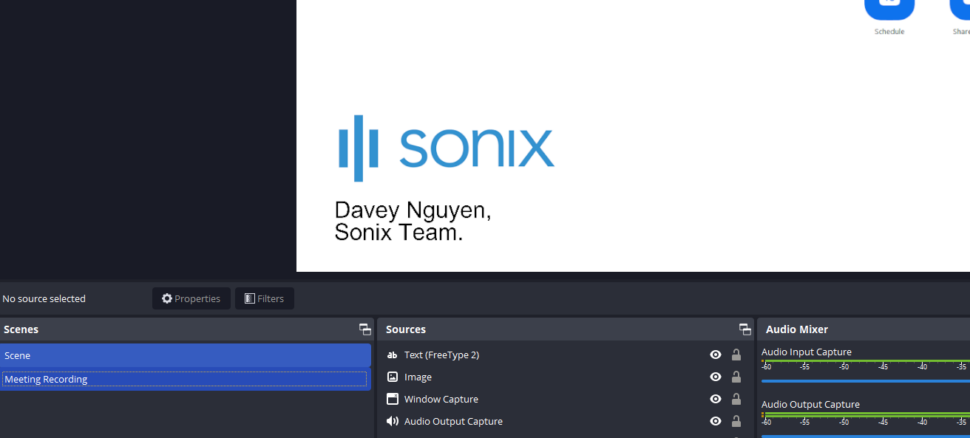
To add an overlay:
- Create your overlay image or video using graphic design software, such as Adobe Photoshop or Canva.
- In OBS Studio, click the “+” (plus) button in the “Sources” box and select “Image” or “Media Source” depending on whether you’re using a static image or video.
- Name the source and click “OK.”
- Browse for your overlay file and click “Open.”
- Position and resize the overlay as desired in the preview area.
Saving and managing scenes
As you compose your scene, remember to save your work regularly. To save your current scene setup, right-click in the “Scenes” box and select “Save Scene.” Give your scene a descriptive name and click “OK.”
You can create multiple scenes for different recording configurations or segments of your Zoom meeting. To add a new scene, click the “+” (plus) button in the “Scenes” box, name the scene, and click “OK.” Duplicate and modify existing scenes to quickly create variations without starting from scratch.
Remember that you will not have to do these settings frequently. OBS will remember your configurations the next time you start the app.
How to Record a Zoom Meeting with OBS
Now that you have OBS Studio set up and configured for recording your Zoom meetings, follow these steps to start capturing your meeting:
- Launch OBS Studio: Open OBS Studio on your computer and ensure that your scene is set up with the Zoom window capture and any other desired sources.
- Start your Zoom meeting: Open the Zoom application and start or join the meeting you want to record. Make sure the Zoom window is visible on your screen and not minimized or obscured by other windows.
- Check your Audio Levels: Before starting the recording, check your audio levels in the OBS Studio “Audio Mixer.” Speak into your microphone and watch the audio meters to ensure that your voice is being captured at an appropriate level. If the audio levels are moving like this, you’re most likely recording properly.

- Start Recording in OBS Studio: When you’re ready to begin recording, click the “Start Recording” button in the OBS Studio control panel. OBS will now capture your Zoom meeting, including the video and audio sources you’ve set up.
- Participate in your Zoom meeting: Once the recording has started, focus on participating in your Zoom meeting as you normally would. OBS Studio will continue to record in the background, capturing everything that happens in the meeting.
- Stop the Recording: When your Zoom meeting concludes, or you want to stop recording for any reason, click the “Stop Recording” button in the OBS Studio control panel. OBS will finalize the recording and save the video file to your specified output directory.
- Recording Format: By default, OBS Studio saves recordings in the MKV format. If you prefer a different format, such as MP4, you can change this in the “Output” settings before starting your recording.
How to Transcribe Your Recorded Zoom Meeting
After recording your Zoom meeting with OBS, the best way to utilize the contents of your meeting is to transcribe it. Transcribing your recording makes it easier to review, search, and share the content with others.
For this, Sonix stands out as the best transcription software available. With an impressive 99% accuracy rate, it ensures your transcriptions are reliable and precise. Supporting over 39 languages, Sonix caters to a global audience, making it incredibly versatile. It offers enterprise-grade security, so your sensitive data remains protected at all times.
The speed of Sonix is unmatched, allowing fast transcription without compromising quality. Additionally, it provides excellent collaboration tools, making it easy for teams to work together on transcripts. Sonix even allows you to burn subtitles directly into your video, enhancing accessibility and engagement for your content.
Here’s a step-by-step guide on how to transcribe your Zoom meeting recording using Sonix:
1. Upload Your Video to Sonix
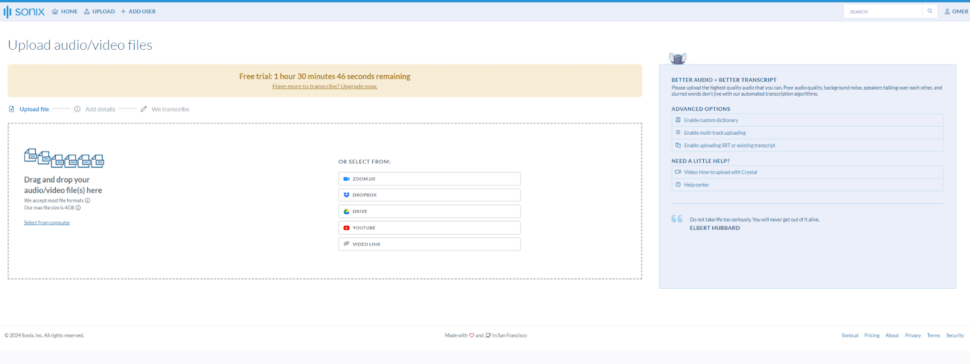
- The first step is to upload your recording to Sonix. Once you’re logged in, go to the Sonix upload page.
- Drag and drop your recording to the site and wait for it to upload.
- Once the upload is complete, you have the option to select languages. This isn’t necessary though, as Sonix will auto-detect the language if this is left empty.
- Other than that, you’re also given the option to choose whether or not you want to label speakers as well. This is one of Sonix’s AI analysis features that labels all the speakers in your recording and diarizes their contributions.
2. Transcribe Your File
- Once you’ve selected all the right settings, hit the “Transcribe” button at the bottom of your window and Sonix will begin processing your file.
- Once the transcription is complete, you’ll receive a notification on your email.
3. Edit and Polish Your Transcript
- When the transcription is complete, review the generated text for accuracy. While Sonix is practically unrivaled in terms of accuracy, there may still be some errors or inconsistencies.
- Use Sonix’s built-in editor to make corrections, add punctuation, or format the text as needed. Sonix offers a side-by-side view of the video and transcript, making it easier to follow along and make edits.
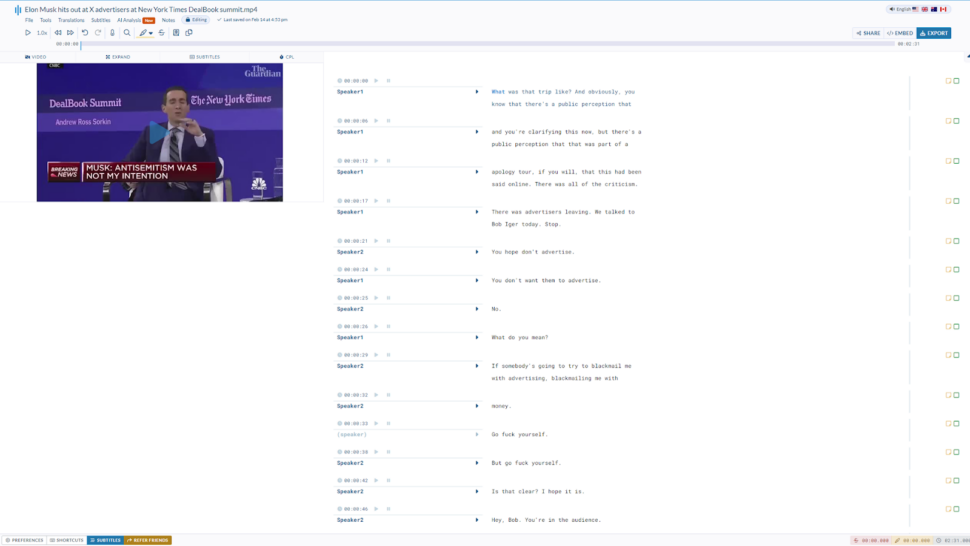
- Once you’re satisfied with the edited transcript, export it in your preferred format. Sonix offers multiple options including, TXT, DOC, PDF, or SRT.
- If you want to burn subtitles directly into your video, Sonix can do that as well. However, it might end up hiding some content in your recording, so that’s something to be careful about.
Transcribing your recorded Zoom meetings with an automated service like Sonix streamlines the process of converting audio to text. By following these steps, you can create accurate and accessible transcripts that make it easier to review, search, and share the valuable content captured in your virtual meetings.
Closing Thoughts
Recording Zoom meetings with OBS Studio and optimizing the settings, as mentioned, can significantly enhance the quality and effectiveness of your recordings. These recordings become invaluable resources for review, training, or content creation.
Understanding the pain points of trying to capture and review important discussion points in virtual meetings, Sonix provides an easy solution for converting your Zoom meeting recordings into searchable, editable text. With Sonix’s advanced transcription services, you can quickly transcribe your meetings, making it easy to find specific parts of the conversation or share insights with others who were unable to attend.
Try Sonix’s free trial today and get 30-minutes of free transcription. No credit card required.
Frequently Asked Questions
Can You Record a Zoom Meeting if You Are Not the Host?
Yes, you can record a Zoom meeting with OBS even if you are not the host, as long as you have permission to record the meeting.
How Do I Record a Zoom Meeting Without Permission?
Recording a Zoom meeting without permission may violate privacy laws or the meeting host’s preferences. Always seek permission before recording.
Can I Record Multiple Audio Sources in Obs?
Yes, OBS allows you to record multiple audio sources, such as your microphone, system audio, and the Zoom meeting audio.
How Do I Record an Online Meeting with Obs?
To record an online meeting with OBS, follow the steps outlined in this guide, which include setting up your video and audio sources, capturing the meeting window, and starting and stopping the recording.

