

I denne artikel
Optagelse af en Zoom-møde Med OBS Studio får du fuld kontrol over videokvalitet, lydkilder og scenelayout – langt mere end det, Zooms indbyggede optagerfunktion tilbyder. OBS er gratis, open source og findes til Windows, macOS og Linux.
Kort oversigt
- OBS Studio er et gratis open source-program, der optager Zoom-møder i bedre kvalitet end Zooms indbyggede optager
- Opsætningen foregår i 5 trin: installation af OBS, konfiguration af videoindstillinger, tilføjelse af lydkilder, optagelse af Zoom-vinduet og start af optagelsen
- Almindelige problemer: ingen lyd (løsning: tilføj en »Audio Output Capture«-kilde), sort skærm (løsning: deaktiver Zoom-hardwareacceleration eller skift til »Window Capture«)
- OBS optager lyden fra din mikrofon uafhængigt af Zooms lydslukningsknap; tjek lydmixeren, inden du går i gang
- Efter optagelsen skal du uploade den til Sonix for at få en fil, der kan søges i og redigeres transskription af dit Zoom-møde på få minutter
Optagelse af Zoom-møder bliver et stadig mere almindeligt behov i forbindelse med fjernarbejde. Uanset om du afholder interviews, afholdelse af webinarer eller ledelse af team online-møder, er det vigtigt at have en pålidelig optagelsesløsning.
Selvom Zoom har en indbygget optagefunktion, giver brugen af OBS Studio dig større kontrol, fleksibilitet og en bedre kvalitet af det færdige resultat, især hvis du har planer om at efterbehandle optagelserne med henblik på transskription eller at uploade dem til YouTube.
Det vigtigste at tage med
- OBS Studio optager lyd og video fra flere kilder samtidigt, hvilket giver dig større kontrol end Zooms indbyggede optager
- Du kan optage lyden fra din mikrofon uafhængigt af Zooms lydslukningsknap; OBS har sine egne lydindstillinger
- En sort skærm eller lyd, der ikke kommer igennem, er de to mest almindelige problemer ved opsætningen, og begge kan løses ganske enkelt
- Med OBS Virtual Camera kan du indsætte en OBS-scene med dit brand i Zoom som din kamerakilde
- Optag i MKV for at sikre mod nedbrud, og konverter derefter til MP4, før du deler eller uploader til Sonix
Hvad er OBS Studio?
OBS Studio er et gratis open source-program til videooptagelse og livestreaming, der findes til Windows, macOS og Linux. Det optager lyd og video fra flere kilder samtidigt, herunder programvinduer, webkameraer, mikrofoner og systemlyd, hvilket gør det velegnet til at optage Zoom-møder med større kontrol end Zooms indbyggede optager.
Dens alsidighed gør den til et populært valg blandt indholdsskabere, videoproducenter, podcastere, samt fagfolk, der har brug for pålidelige optagelser af høj kvalitet.
OBS eller Zooms indbyggede optagefunktion: Hvilken skal du vælge?
Inden man konfigurerer OBS, er det en fordel at vide, hvornår det er det rette værktøj til opgaven.
| Funktion | OBS Studio | Indbygget zoom |
|---|---|---|
| Omkostninger | Gratis | Inkluderet i Zoom-abonnementet |
| Kvalitetskontrol af videoer | Fuld (opløsning, FPS, bithastighed) | Begrænset |
| Lyd fra flere kilder | Ja | Nej |
| Brugerdefinerede overlejringer og branding | Ja | Nej |
| Kræver opsætning | Ja (5–10 minutter) | Nej |
| Underretter deltagerne | Nej | Ja (banneret vises) |
| Udgangsformat | MKV (standard), MP4 | MP4 |
| Bedst til | Optagelser af høj kvalitet, der er efterbearbejdet | Hurtige optagelser uden forberedelse |
Vælg OBS når du har brug for lyd i broadcast-kvalitet, flere lydspor, brugerdefinerede overlejringer eller har planer om at redigere og offentliggøre optagelsen.
Vælg Zooms indbyggede optager når du har brug for en hurtig optagelse uden forberedelse og ikke har planer om at redigere optagelserne.
Hvorfor optage Zoom-møder med OBS?
En af de vigtigste fordele ved at bruge OBS til Zoom-møde optagelser er den grad af tilpasning og kontrol, den tilbyder. Du kan finjustere dine video- og lydindstillinger, arrangere dit scenelayout og tilføje yderligere elementer som tekstoverlejringer eller branding.
- Optagelser af højere kvalitet: OBS optager Zoom-møder i høj opløsning og med den billedfrekvens, du vælger, hvilket giver klarere og mere professionelt udseende videoer end Zooms indbyggede funktion. Det er vigtigt, hvis du har planer om at dele optagelserne med et bredere publikum eller bruge dem til undervisning.
- Tilpasselig scenekomposition: Du kan ændre størrelsen på og placere Zoom-vinduet, tilføje logoer eller vandmærker, indsætte et webcam-billede eller lægge tekstlag ovenpå. OBS håndterer alt dette i realtid, hvilket fremskynder efterproduktionen betydeligt.
- Optagelse af lyd fra flere kilder: Optag lyd fra din mikrofon, computerlyd og Zoom-mødet samtidigt. Du kan optage separate lydspor til redigering i efterproduktionen eller tilføje kommentarer til mødelydsporet.
- Gratis og open source: OBS Studio er helt gratis at bruge og distribuere. Programmet forbedres løbende af et fællesskab af udviklere, og der findes et stort udvalg af brugeroprettede ressourcer og vejledninger online.
Problemer med privatlivets fred, når du optager Zoom-møder med OBS
Inden du begynder at optage, skal du være opmærksom på, at optagelse af møder kan give anledning til betydelige bekymringer vedrørende privatlivets fred og juridiske spørgsmål.
Afhængigt af, hvor du befinder dig, kan det være ulovligt at optage samtaler uden udtrykkeligt samtykke. I nogle jurisdiktioner kræves det, at alle parter giver deres samtykke, mens det i andre er tilstrækkeligt, at én part er klar over det. Når du bruger OBS, får deltagerne ikke automatisk besked herom, som det er tilfældet med Zooms indbyggede optager.
For at overholde lovgivningen skal du indhente mundtligt samtykke fra alle deltagere, inden optagelsen påbegyndes. Gør det klart, at mødet vil blive optaget, og forklar, hvordan optagelsen vil blive brugt. Denne fremgangsmåde skaber tillid og hjælper dig med at overholde de lovmæssige krav i de fleste jurisdiktioner.
Sådan sætter du OBS op til at optage Zoom-møder
Når man skal konfigurere OBS for første gang, er der en række detaljer, man skal være opmærksom på. Her er den hurtigste vej til en konfiguration, der virker.
Trin 1: Download og installer OBS Studio
Download den nyeste version af OBS Studio fra officiel hjemmeside. Softwaren fås til Windows, macOS og Linux.
Kør installationsprogrammet, og følg vejledningen på skærmen. Det tager et par minutter.
- Standardindstillinger: Hold dig til standardindstillingerne, medmindre du har særlige krav.
- Installationssted: Husk, hvor OBS installeres; du får muligvis brug for denne mappe senere til plugins eller brugerdefinerede indstillinger.
Efter installationen skal du starte OBS Studio. Når du bliver bedt om at køre guiden til automatisk konfiguration, skal du vælge “Optimer kun til optagelse”. Dette giver dig et brugbart udgangspunkt, som du derefter kan justere i trin 2 og 3.
Trin 2: Konfigurer videoindstillinger
Klik på “Indstillinger” i nederste højre hjørne af OBS-hovedvinduet, og gå derefter til fanen “Video”.
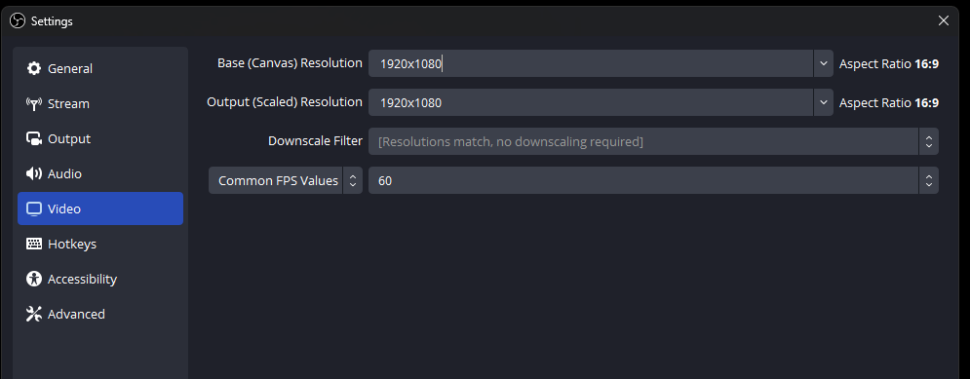
Basis (lærred) opløsning
Indstil denne værdi, så den passer til din skærms opløsning. Hvis du er i tvivl, kan du vælge 1920×1080, som er den mest almindelige indstilling. Almindelige valgmuligheder:
- 1920×1080 (1080p)
- 1280×720 (720p)
- 2560×1440 (1440p)
Output (skaleret) Opløsning
Dette bestemmer den endelige opløsning på din optagede video. Sørg for, at den er identisk med arbejdsfladens opløsning for at opnå den bedste kvalitet. Hvis du har brug for mindre filstørrelser, kan du reducere opløsningen til 1280×720.
Nedskaleringsfilter
Hvis din basisopløsning og udgangsopløsning er forskellige, skal du indstille nedskaleringsfilteret til “Lanczos” for at opnå den bedste balance mellem kvalitet og ydeevne. Denne indstilling er ikke tilgængelig, når begge opløsninger er identiske.
Almindelige FPS-værdier
- 30 FPS: Standard for de fleste optagelser; god balance mellem kvalitet og filstørrelse.
- 60 FPS: Mere jævn bevægelse; bedre egnet til indhold med højt tempo eller velpolerede præsentationer.
Klik på “Anvend” og derefter på “OK” for at gemme.
Udgangsformat: MKV vs. MP4
Inden du forlader Indstillinger, skal du gå til fanen “Output” og kontrollere dit optagelsesformat.
- MKV er OBS’ standardindstilling, fordi den er nedbrudssikker. Hvis OBS går ned midt i en optagelse, gendanner MKV-formatet filen; det gør MP4-formatet ikke.
- MP4 er mere kompatibel med videoredigeringsprogrammer, YouTube og Sonix.
- Anbefalet arbejdsgang: Optag i MKV, og brug derefter OBS’s indbyggede remux-værktøj (Filer > Remux optagelser) til at konvertere til MP4 uden at omkode. Det giver dig beskyttelse mod nedbrud under optagelsen og sikrer kompatibilitet bagefter.
Trin 3: Opsæt lydkilder
For at opnå lyd i høj kvalitet kræves der to specifikke kilder i OBS.
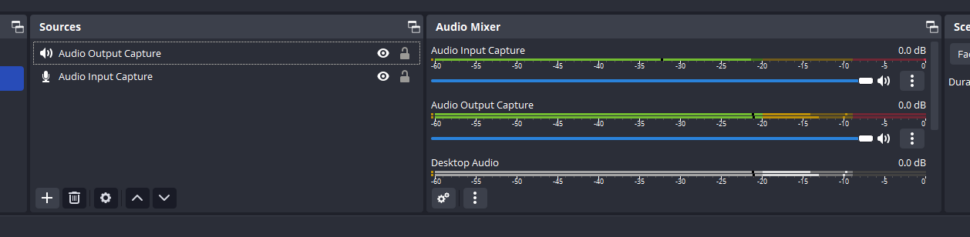
- I OBS-hovedvinduet skal du finde afsnittet “Audio Mixer” nederst i midten.
- Klik på “+”-knappen i feltet “Kilder”, og tilføj “Audio Input Capture” til din mikrofon.
- Tilføj “Audio Output Capture” til dit systemlyd (dette optager lyden fra Zoom-mødet).
- Giv hver kilde et tydeligt navn, for eksempel “Mikrofon” og “Zoom-lyd”.”
- Juster lydstyrkeskyderne, så lydniveauerne er afbalancerede og ikke går i clipping (bliver røde).
- For at forbedre lydkvaliteten skal du højreklikke på en kilde i lydmixeren, vælge “Filtre” og tilføje støjundertrykkelse eller forstærkning efter behov.
Vigtigt: Hvis du slår lyden fra på din mikrofon i Zoom, fortsætter OBS med at optage lyden fra din mikrofon uafhængigt heraf. For at forhindre OBS i at optage lyden fra din mikrofon skal du klikke på højttalerikonet ved siden af måleren for »Audio Input Capture« i OBS-lydmixeren eller fjerne kilden helt.
Trin 4: Tilføj zoom-vinduesoptagelse
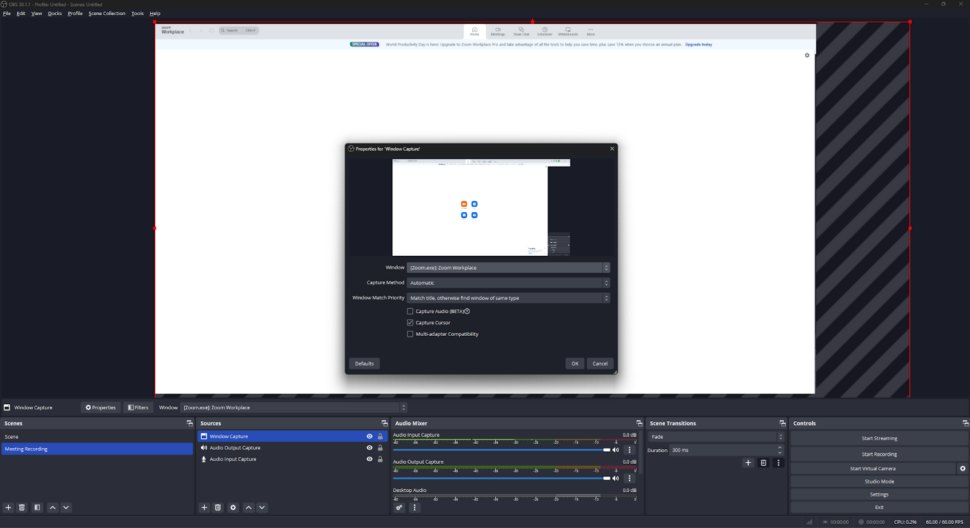
- Åbn dit Zoom-møde, og arranger vinduet som ønsket.
- I OBS skal du klikke på “+”-knappen i feltet “Kilder”.
- Vælg “Window Capture”.”
- Indtast navnet på kilden (f.eks. “Zoom-møde”) og klik på “OK”.”
- I vinduet “Opret/Vælg kilde” skal du vælge Zoom-vinduet fra rullemenuen “Vindue”.
- Klik på “OK” for at tilføje kilden til din scene.
Tips til optagelse af dit Zoom-møde:
- Sørg for, at Zoom-vinduet forbliver synligt og ikke minimeres eller dækkes til under optagelsen.
- Hvis du har flere skærme, skal du kontrollere, at OBS optager fra den rigtige skærm.
- Tilføj andre kilder (webcam, præsentationsslides) ved at gentage ovenstående fremgangsmåde.
Trin 5: Juster scenens komposition
Når du har tilføjet dine kilder, skal du placere dem, så de fremstår overskueligt og professionelt.
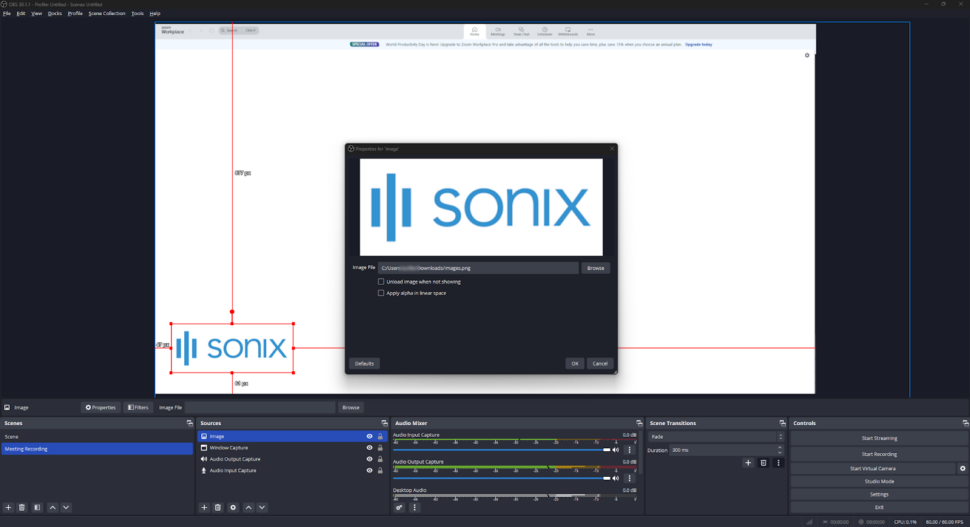
- Ændring af størrelse og placering af kilder: Klik og træk i kanterne på hver kilde i forhåndsvisningsområdet for at ændre størrelsen. Træk for at flytte dem. Et almindeligt layout er at placere webkameraet i et hjørne og Zoom-vinduet i midten.
- Juster kildeegenskaberne: Højreklik på en kilde i feltet “Kilder”, og vælg “Egenskaber” for at få adgang til indstillinger for gennemsigtighed, farvekorrektion og andre indstillinger.
- Brug sceneovergange: Klik på “+” i feltet “Sceneovergange” for at tilføje bløde overgange mellem scenerne.
Tilføjelse af et overlay med logo
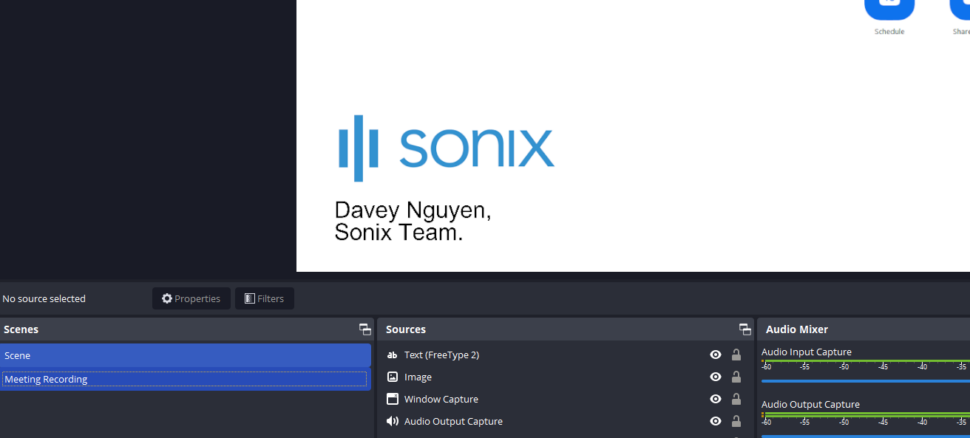
Hvis du vil tilføje et logo-overlay til din optagelse, skal du oprette et billede i et hvilket som helst designprogram (f.eks. Adobe Photoshop eller Canva) og derefter indsætte det i OBS som en billedkilde (Kilder > + > Billede) og placere det i forhåndsvisningen. OBS lægger det automatisk oven på dit Zoom-vindue.
Gemme og administrere scener
Højreklik i feltet “Scener” og vælg “Gem scene” for at gemme dit layout. Opret flere scener til forskellige optagelseskonfigurationer. OBS husker dine indstillinger, næste gang du åbner appen.
Brug af OBS Virtual Camera sammen med Zoom
Med OBS Virtual Camera kan du indsætte hele din OBS-scene (herunder overlays, flere kilder og brugerdefinerede layouts) i Zoom som din kamerakilde. De andre deltagere ser din OBS-scene med dit brand i stedet for et almindeligt webcam-billede.
Sådan aktiveres det:
- I OBS skal du gå til Værktøjer > Start virtuelt kamera.
- I Zoom skal du åbne Videoindstillinger > Kamera og vælge “OBS Virtual Camera” fra rullemenuen.
- Din OBS-scene vises nu som dit Zoom-kamera for alle deltagere.
Dette er nyttigt for oplægsholdere, der ønsker, at overlejringer med deres logo eller »billede-i-billede«-layouter skal være synlige for alle deltagere i mødet, ikke kun i den lokale optagelse.
Sådan optager du et Zoom-møde med OBS
Nu hvor OBS er konfigureret, skal du følge disse trin for at optage dit møde.
- Start OBS Studio: Åbn OBS, og kontroller, at din scene er konfigureret med optagelse af Zoom-vinduet og eventuelle andre kilder.
- Start dit Zoom-møde: Åbn Zoom, og start eller deltag i mødet. Sørg for, at Zoom-vinduet forbliver synligt på skærmen.
- Kontroller dine lydniveauer: Inden du begynder at optage, skal du tale ind i mikrofonen og holde øje med målerne i lydmixeren. Hvis bjælkerne bevæger sig, bliver lyden optaget.
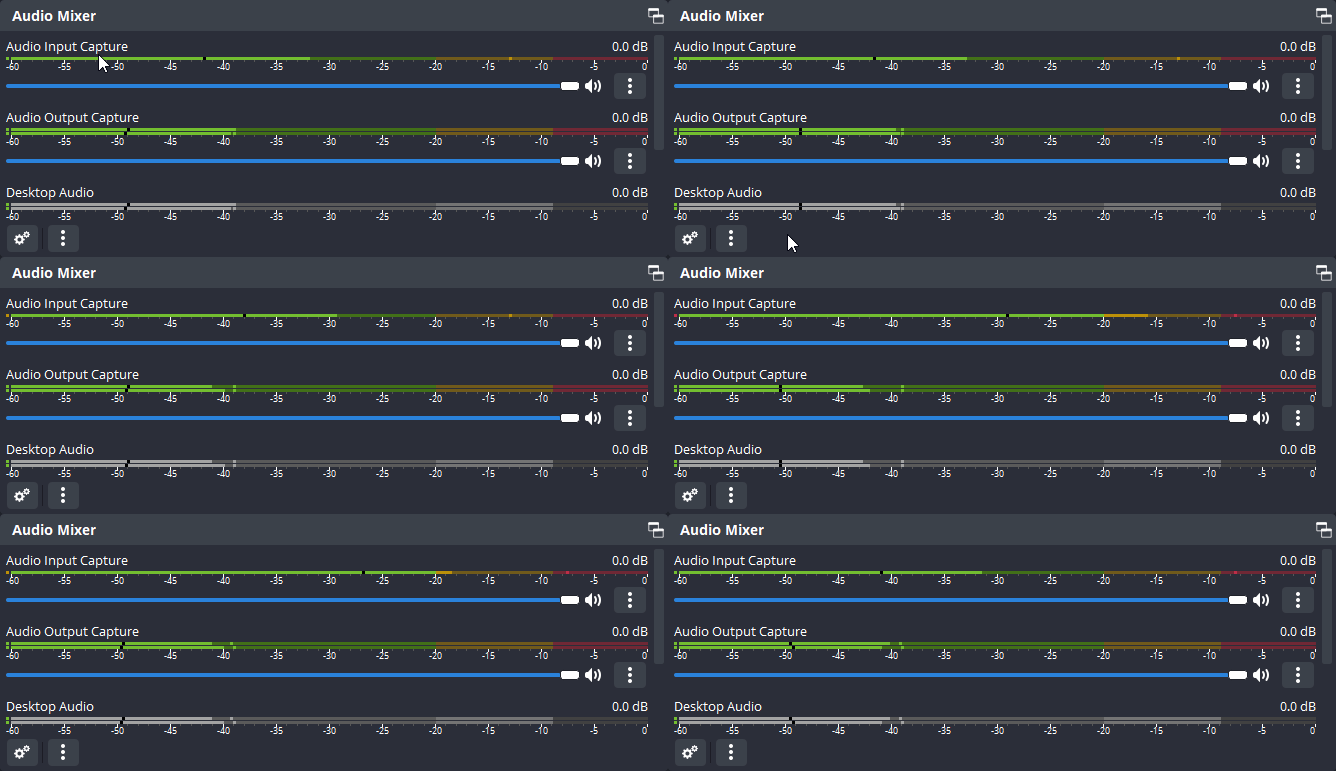
- Start optagelse: Klik på “Start optagelse” i OBS-kontrolpanelet. OBS optager dit Zoom-møde, herunder alle video- og lydkilder.
- Deltag som normalt: OBS optager i baggrunden. Du kan roligt koncentrere dig om dit møde.
- Stop optagelsen: Klik på “Stop optagelse”, når mødet er slut. OBS gemmer filen i den angivne udskriftsmappe.
Fejlfinding ved almindelige problemer med optagelse i OBS og Zoom
Dette er de problemer, som brugerne oftest støder på efter installationen.
OBS optager video, men lyden er slået fra
Årsag: Kilden »Audio Output Capture« mangler, eller Zooms lyd sendes til en enhed, som OBS ikke overvåger.
Rettelse: Tilføj en »Audio Output Capture«-kilde i OBS, og indstil den til den samme afspilningsenhed, som Zoom bruger. Kontroller, at lydmåleren bevæger sig i OBS Audio Mixer, mens mødet er i gang.
OBS viser en sort skærm eller et fastfrosset billede, når der optages fra Zoom
Årsag: I Windows kan hardwareaccelererede apps (herunder Zoom) blokere Window Capture. I Linux skyldes dette en uoverensstemmelse mellem Pipewire- og Pulseaudio-kilder.
Løsning (Windows): Højreklik på kilden “Window Capture” > Egenskaber > aktiver »Tillad gennemsigtighed«. Alternativt kan du deaktivere hardwareacceleration i Zoom (Indstillinger > Video > Avanceret > fjern markeringen fra indstillingerne for hardwareacceleration). Hvis ingen af delene virker, skal du skifte til »Display Capture«.
Løsning (Linux): Skift fra »Screen Capture (Pipewire)« til »Window Capture (Pipewire)«, og vælg Zoom-vinduet direkte fra rullemenuen.
Min mikrofon optager, selv når den er slået fra i Zoom
Årsag: Zoom-funktionen »Mute« slår kun din mikrofon fra i Zoom. OBS optager mikrofonlyden uafhængigt via sin egen lydindgangskilde.
Rettelse: Klik på højttalerikonet ved siden af måleren for »Audio Input Capture« i OBS-lydmikseren for at slå lyden fra i OBS, eller fjern kilden helt, inden du begynder at optage.
Optagelsesfilen er for stor
Årsag: MKV-filer med høj bithastighed resulterer i store filer.
Rettelse: I OBS-indstillinger > Output > Optagelse skal du ændre formatet til MP4 og indstille koderen til x264 med en CRF på 23 for at opnå en god balance mellem kvalitet og filstørrelse. Du kan også bruge fremgangsmåden under Fil > Remux optagelser, som er beskrevet i trin 2.
OBS og Zoom-lyden er ude af synkronisering
Årsag: Forsinkelserne ved lyd- og videobehandlingen varierer alt efter kilden.
Rettelse: Højreklik på lydkilden i Lydmixeren > Filtre > tilføj et “Video Delay (Async)”-filter til videokilden. Du kan også bruge feltet “Sync Offset” i de avancerede lydindstillinger til at synkronisere sporene manuelt.
Sådan transskriberer du dit optagede Zoom-møde
Efter Optag dit Zoom-møde, og ved at transskribere det bliver indholdet søgbart, delbart og let at gennemgå.
Sonix er det bedste transskriptionssoftware til denne arbejdsgang. Den tilbyder hurtig og præcis transskription, understøtter 53+ sprog, indeholder Sikkerhed på virksomhedsniveau, og omfatter samarbejdsværktøjer der gør det nemt for teams at arbejde sammen på transskriptioner. Sonix genererer også automatiserede resuméer og automatiserede undertekster direkte fra din optagelse.
1. Upload din video til Sonix
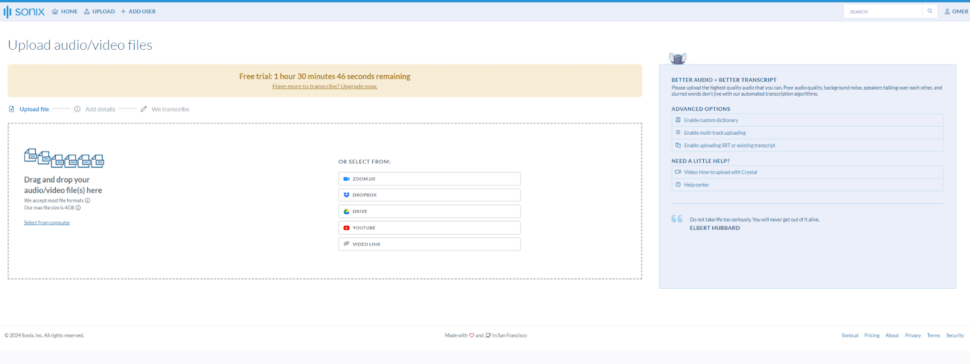
- Log ind og gå til Sonix-upload side.
- Træk og slip din optagelse, og vent, indtil overførslen er færdig.
- Vælg et sprog, hvis det er nødvendigt; Sonix registrerer automatisk sproget, hvis du lader feltet stå tomt.
- Aktivér højttalerbetegnelser, hvis du vil have Sonix’er AI-analysefunktioner for at identificere og registrere hver deltagers bidrag.
2. Transskriber din fil
- Klik på “Transkriber”. Sonix går straks i gang med behandlingen.
- Du vil modtage en e-mail, når karakterudskriften er klar.
3. Rediger og finpuds din udskrift
- Kontroller, at den genererede tekst er korrekt.
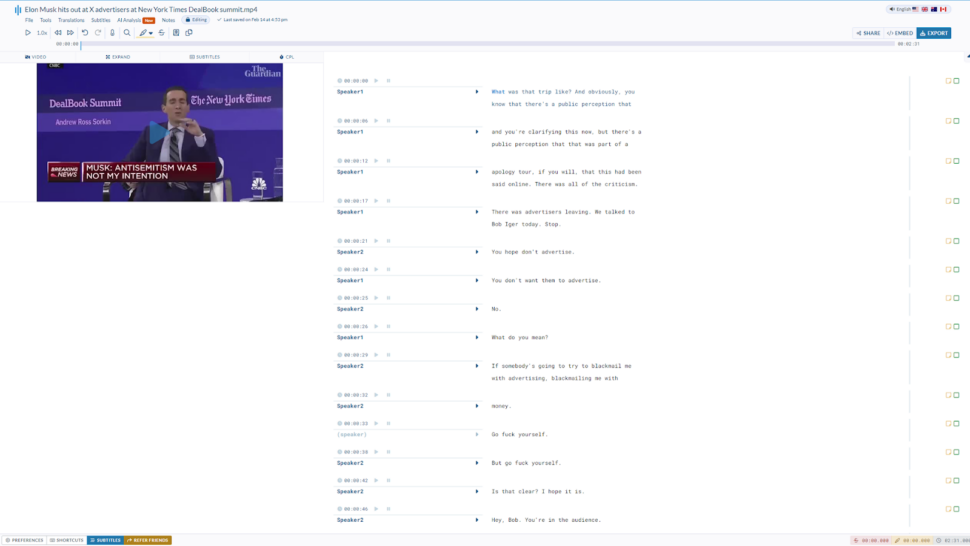
- Brug Sonix’s browserbaserede redigeringsværktøj til at foretage rettelser, tilføje tegnsætning eller omformatere teksten. Den side-ved-side-visning af video og transskription gør det nemt at følge med.
4. Eksporter og del din udskrift
- Eksporter i dit foretrukne format: TXT, DOC, PDF eller SRT.
- Hvis du vil indbrænde undertekster direkte i din video, kan Sonix også klare det. Husk, at indbrændte undertekster er permanente, så tjek placeringen, inden du eksporterer.
Transskribering af dine optagede Zoom-møder Med Sonix kan man på få minutter omdanne timevis af lyd til et dokument, der kan søges i og redigeres.
Afsluttende tanker
OBS giver dig fuld kontrol over, hvordan dine Zoom-møder optages: bedre kvalitet, større fleksibilitet og ingen afhængighed af Zooms egne begrænsninger for optagelse. Når du har optagelsen, kan du transskribere den med Sonix, så hvert møde bliver søgbart og kan deles.
Prøv Sonix' gratis prøveperiode i dag, og få 30 minutters gratis transskription. Der kræves ikke kreditkort.
Ofte stillede spørgsmål
Kan man optage et Zoom-møde med OBS, hvis man ikke er vært?
Ja. OBS optager alt, hvad der vises på din skærm, uanset hvilken rolle du har i mødet. Du skal dog stadig have tilladelse fra værten eller deltagerne, før du kan optage.
Optager OBS Zoom-møder, uden at de andre deltagere ved det?
OBS udløser ikke Zooms banner med besked om optagelse. Deltagerne vil ikke se en advarsel på skærmen. Derfor er det særligt vigtigt at indhente mundtligt samtykke, inden du går i gang – både af hensyn til overholdelse af lovgivningen og for at sikre gennemsigtighed.
Hvorfor er der ingen lyd i min OBS-Zoom-optagelse?
Den mest almindelige årsag er, at kilden til lydoptagelse mangler. Tilføj en i OBS, indstil den til den samme afspilningsenhed, som Zoom bruger, og kontroller, at måleren bevæger sig i lydmixeren under mødet.
Hvad er det bedste outputformat til optagelse af Zoom-møder i OBS?
Optag i MKV-format for at sikre mod nedbrud, og brug derefter »File > Remux Recordings« i OBS til at konvertere til MP4 uden at omkode. MP4 er mere kompatibelt med videoredigeringsprogrammer, YouTube og Sonix.
Hvordan optager jeg et Zoom-møde uden tilladelse?
Optagelse uden tilladelse kan være i strid med lovgivningen om privatlivets fred eller værtens ønsker. Sørg altid for at indhente udtrykkeligt samtykke, før du optager et møde.
Kan jeg optage flere lydkilder i OBS?
Ja. OBS optager flere lydkilder samtidigt, herunder din mikrofon, systemlyden og lyden fra Zoom-mødet. Hver kilde vises som et separat spor i lydmixeren.
Hvordan optager jeg et online-møde med OBS?
Følg de fem trin i denne vejledning: Installer OBS, konfigurer videoindstillingerne, tilføj lydkilder, indfang mødevinduet, og start optagelsen. Den samme fremgangsmåde gælder for Zoom, Google Meet, Microsoft Teams og andre konferenceplatforme.
Verdens mest præcise AI-transskription
Sonix transskriberer din lyd og video på få minutter - med en nøjagtighed, der får dig til at glemme, at det er automatiseret.


 Danish
  English
  Spanish
  German
  French
  Russian
  Portuguese
  Dutch
Dutch  Chinese
  Turkish