
In this article
InAdding subtitles to your videos is no longer optional; it’s a necessity.
Whether you’re aiming for accessibility, improving viewer retention, or reaching a multilingual audience, subtitles are now an integral part of video editing. iMovie, Apple’s built-in editing software, makes it possible to add subtitles on Mac, iPhone, and iPad. But despite iMovie’s user-friendly interface, the subtitle process can be tedious if you don’t know where to start.
This step-by-step guide explains the exact methods for adding subtitles in iMovie across Apple devices. Whether you’re editing on a Mac with full timeline control or using iMovie on a mobile device with limited formatting options, you’ll learn how to create clean, legible subtitles that align perfectly with your content.
How to Add Subtitles in iMovie on Mac

If you’re editing on a Mac, iMovie offers a simple way to manually add subtitles to your video. While it doesn’t generate subtitles automatically, its built-in title tools allow you to create clear, well-timed captions that enhance your content.
Follow the steps below to add subtitles to your project from start to finish.
Step 1: Setting Up Your iMovie Project
- Open iMovie on your Mac.
- Click ‘Create New’ for a new project or select an existing one.
- Click the ‘Import’ button or drag your video file into the timeline.
- Skim through your video to ensure it’s loaded correctly.
Step 2: Selecting an Appropriate Subtitle Style
- Click the ‘Titles’ button to view text styles.
- Hover to preview; use styles like ‘Lower Third’ or ‘Standard’ for readability.
- Choose a clear, legible font and appropriate size.
Step 3: Adding and Customizing Your Subtitles
- Drag a title to the timeline.
- Double-click to edit the text.
- Keep subtitles concise (under 70 characters).
- Repeat for each segment throughout the video.
Step 4: Syncing Subtitles with Your Video
- Play the video and check subtitle timing.
- Adjust duration by dragging edges of the title block in the timeline.
Step 5: Reviewing Your Work
- Watch the entire video to check for typos or timing issues.
- Preview on different screen sizes for readability.
Step 6: Exporting Your Video
- Click ‘File’ > ‘Share’ > ‘File’.
- Choose resolution and format, then save your video.
How to Add Subtitles in iMovie on iPad or iPhone
Using iMovie on an iPad or iPhone? You can still add subtitles with just a few taps. The mobile version of iMovie includes all the basic title tools you need to insert and time subtitles manually.
Here’s how to add subtitles directly from your device.
- Open iMovie and create or open a project.
- Tap the “+” to add video to the timeline.
- Tap the “T” (Titles) icon to access text styles.
- Select a subtitle-friendly style like ‘Standard’.
- Tap the text box to type your subtitle.
- Drag to position and adjust subtitle duration.
- Repeat for each subtitle segment.
- Tap Done, then export using the Share icon.
Does iMovie Automatically Generate Subtitles?
Unlike Adobe Premiere Pro, iMovie does not automatically generate subtitles. And, even though subtitles add a fair bit of time to your overall editing hours, it’s worth it. There are many benefits of adding subtitles to video content.
But, before you start typing away to add subtitles to your video, there are other alternatives that can allow you to add subtitles to a video automatically, and one of them is Sonix!
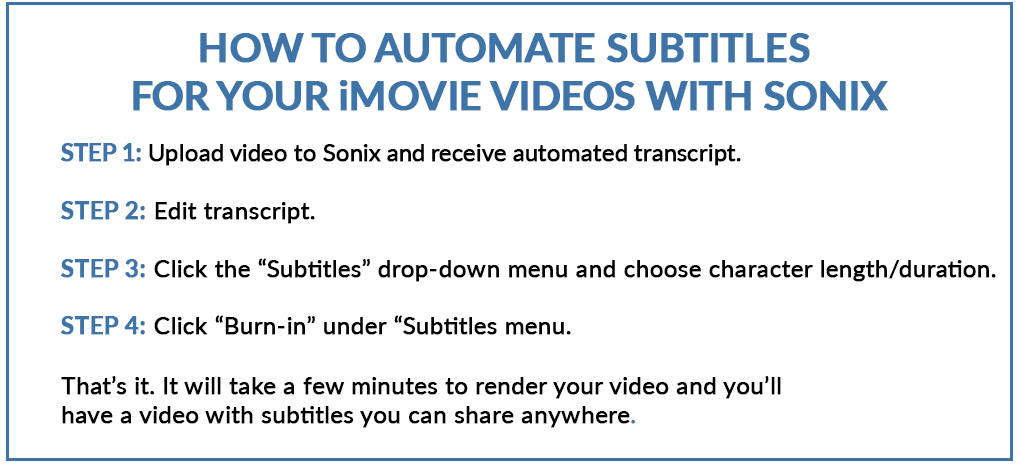
Using Sonix, all you need to do is follow four simple steps to add subtitles to your video in just a few seconds:
Curious to see how it works? Try it yourself and sign up for 30 minutes of free transcription with complete access to our transcription services without entering your credit card!
Adding Subtitles on iMovie: Is Sonix AI Better than the DIY Approach?
We’ve listed down the steps required to add subtitles to an iMovie project manually, but you should know that this is a pretty time-consuming process, especially if you’re looking to put out multiple pieces of content in a week.
If you want to spend less time in the editing suite and more time creating new video content, it might be better to use an automatic AI subtitle generator like Sonix for your iMovie videos.
Remember, accuracy, timing, and consistency are key to successful subtitles. With Sonix, you can generate subtitles with almost 99% accuracy in just a few minutes every single time.
Don’t want to take our word for it? Click here to sign up for 30 minutes of free transcription. Complete access, and no credit card required.
How to Add Subtitles on iMovie: Frequently Asked Questions
How to Edit and Customize Subtitles in iMovie?
To edit and customize subtitles in iMovie, click on the subtitle text box in the timeline or preview window. From there, you can change the font, size, color, position, and duration. You can also select different title styles by clicking the “Titles” tab and choosing a new format that fits your video’s look and feel.
How Do I Add Background Subtitles in iMovie?
While iMovie doesn’t have a dedicated “background subtitle” feature, you can create a similar effect by selecting a title style with a background box (like “Standard” or “Reveal Lower Third”). You can also place a solid-color background clip behind the subtitle to improve readability; just make sure it’s positioned correctly in the timeline beneath your text.
How to Add Multiple Subtitles in iMovie?
To add multiple subtitles in iMovie, drag multiple title clips to your timeline, placing each one where you want a new subtitle to appear. Edit each title clip individually with the correct text and adjust the timing to match the audio. You can continue this process throughout the entire video by including as many subtitles as needed.
How to Add Automatic Subtitles in iMovie?
iMovie does not offer built-in automatic subtitle generation. If you want to add subtitles automatically, use a transcription tool like Sonix. Sonix can generate subtitles with up to 99% accuracy, and you can export the subtitle file to use alongside your video in iMovie or other platforms.
World's Most Accurate AI Transcription
Sonix transcribes your audio and video in minutes — with accuracy that'll make you forget it's automated.
