

In diesem Artikel
Aufnahme eines Zoom-Sitzung Mit OBS Studio haben Sie die volle Kontrolle über die Videoqualität, die Audioquellen und das Szenenlayout – weit über das hinaus, was der integrierte Recorder von Zoom bietet. OBS ist kostenlos, Open Source und für Windows, macOS und Linux verfügbar.
Kurzzusammenfassung
- OBS Studio ist eine kostenlose Open-Source-Software, die Zoom-Meetings in höherer Qualität aufzeichnet als der in Zoom integrierte Recorder.
- Die Einrichtung erfolgt in 5 Schritten: OBS installieren, Videoeinstellungen konfigurieren, Audioquellen hinzufügen, das Zoom-Fenster erfassen und die Aufnahme starten
- Häufige Probleme: Kein Ton (Lösung: Fügen Sie eine Audioausgabe-Aufnahmequelle hinzu), schwarzer Bildschirm (Lösung: Deaktivieren Sie die Zoom-Hardwarebeschleunigung oder wechseln Sie zur Fenseraufnahme)
- OBS nimmt Ihr Mikrofon unabhängig von der Stummschalttaste in Zoom auf; überprüfen Sie den Audio-Mixer, bevor Sie beginnen
- Laden Sie die Datei nach der Aufnahme auf Sonix hoch, um eine durchsuchbare, bearbeitbare Transkription Ihres Zoom-Meetings in Minuten
Das Aufzeichnen von Zoom-Meetings wird im Rahmen der Remote-Arbeit immer häufiger erforderlich. Ganz gleich, ob Sie Interviews, Webinare veranstalten oder Teams moderieren Online-Besprechungen, … ist es wichtig, über eine zuverlässige Aufzeichnungslösung zu verfügen.
Zoom bietet zwar eine integrierte Aufnahmefunktion, doch mit OBS Studio haben Sie mehr Kontrolle, Flexibilität und eine höhere Ausgabequalität – insbesondere, wenn Sie die Aufnahmen zur Transkription nachbearbeiten oder auf YouTube hochladen möchten.
Wichtigste Erkenntnisse
- OBS Studio nimmt Audio und Video aus mehreren Quellen gleichzeitig auf und bietet Ihnen damit mehr Kontrollmöglichkeiten als der integrierte Recorder von Zoom.
- Sie können Ihr Mikrofon unabhängig von der Stummschalttaste in Zoom aufnehmen; OBS verfügt über eigene Audio-Steuerelemente
- Ein schwarzer Bildschirm oder Tonausfall sind die beiden häufigsten Probleme bei der Einrichtung; beide lassen sich ganz einfach beheben.
- Mit der OBS Virtual Camera können Sie eine mit Ihrem Branding versehene OBS-Szene als Kameraquelle in Zoom einbinden.
- Nimm das Video zur Absturzsicherheit im MKV-Format auf und konvertiere es anschließend in das MP4-Format, bevor du es teilst oder auf Sonix hochlädst.
Was ist OBS Studio?
OBS Studio ist eine kostenlose Open-Source-Anwendung für Videoaufnahmen und Live-Streaming, die unter Windows, macOS und Linux verfügbar ist. Sie erfasst Audio- und Videosignale aus mehreren Quellen gleichzeitig, darunter Anwendungsfenster, Webcams, Mikrofone und Systemton, und eignet sich daher hervorragend für die Aufzeichnung von Zoom-Meetings, wobei sie mehr Kontrollmöglichkeiten bietet als der in Zoom integrierte Recorder.
Dank seiner Vielseitigkeit ist es bei Content-Erstellern sehr beliebt, Videoproduzenten, Podcaster, sowie Fachleute, die zuverlässige, hochwertige Aufnahmen benötigen.
OBS oder die integrierte Aufnahmefunktion von Zoom: Was sollten Sie verwenden?
Bevor man OBS einrichtet, ist es hilfreich zu wissen, wann es das richtige Werkzeug für die jeweilige Aufgabe ist.
| Merkmal | OBS-Studio | Zoom integriert |
|---|---|---|
| Kosten | Kostenlos | Im Zoom-Tarif enthalten |
| Qualitätskontrolle bei Videos | Voll (Auflösung, FPS, Bitrate) | Begrenzt |
| Audio aus mehreren Quellen | Ja | Nein |
| Individuelle Overlays und Branding | Ja | Nein |
| Muss eingerichtet werden | Ja (5–10 Min.) | Nein |
| Benachrichtigt die Teilnehmer | Nein | Ja (Banner wird angezeigt) |
| Ausgabeformat | MKV (Standard), MP4 | MP4 |
| Am besten für | Hochwertige, nachbearbeitete Aufnahmen | Schnelle Aufnahmen ohne Vorbereitungen |
Wählen Sie OBS wenn Sie eine Ausgabe in Sendequalität, mehrere Audiospuren oder benutzerdefinierte Einblendungen benötigen oder vorhaben, die Aufnahme zu bearbeiten und zu veröffentlichen.
Wählen Sie den in Zoom integrierten Aufzeichner wenn Sie schnell und ohne Vorbereitungen Aufnahmen machen möchten und nicht vorhaben, das Filmmaterial zu bearbeiten.
Warum Zoom-Meetings mit OBS aufzeichnen?
Einer der wichtigsten Vorteile der Verwendung von OBS für Zoom-Sitzung Aufnahmen ist der Grad der Anpassung und Kontrolle, den sie bietet. Sie können Ihre Video- und Audioeinstellungen feinabstimmen, Ihr Szenenlayout gestalten und zusätzliche Elemente wie Texteinblendungen oder Branding hinzufügen.
- Aufzeichnungen in höherer Qualität: OBS zeichnet Zoom-Meetings in hoher Auflösung und mit der von Ihnen gewählten Bildrate auf und liefert so klarere, professioneller wirkende Videos als die integrierte Funktion von Zoom. Dies ist wichtig, wenn Sie die Aufzeichnungen einem breiteren Publikum zugänglich machen oder für Schulungszwecke nutzen möchten.
- Anpassbare Szenenkomposition: Passen Sie die Größe und Position des Zoom-Fensters an, fügen Sie Logos oder Wasserzeichen hinzu, binden Sie ein Webcam-Bild ein oder fügen Sie Textüberlagerungen ein. OBS erledigt all dies in Echtzeit, was die Nachbearbeitung erheblich beschleunigt.
- Multi-Source-Audioerfassung: Nehmen Sie Audio von Ihrem Mikrofon, dem Computer-Audio und dem Zoom-Meeting gleichzeitig auf. Sie können separate Audiospuren für die Nachbearbeitung aufzeichnen oder Kommentare zum Meeting-Audio hinzufügen.
- Frei und Open-Source: OBS Studio kann völlig kostenlos genutzt und weitergegeben werden. Es wird von einer Entwickler-Community kontinuierlich weiterentwickelt und verfügt über eine umfangreiche Sammlung von benutzergenerierten Ressourcen und Tutorials, die online verfügbar sind.
Datenschutzaspekte bei der Aufzeichnung von Zoom-Meetings mit OBS
Bevor Sie mit der Aufzeichnung beginnen: Die Aufzeichnung von Besprechungen kann erhebliche datenschutzrechtliche und rechtliche Bedenken aufwerfen.
Je nach Ihrem Standort kann die Aufzeichnung von Gesprächen ohne ausdrückliche Zustimmung rechtswidrig sein. In einigen Rechtsordnungen ist die Zustimmung aller Beteiligten erforderlich, in anderen reicht es aus, wenn eine Partei davon in Kenntnis gesetzt wird. Bei der Verwendung von OBS werden die Teilnehmer nicht automatisch benachrichtigt, wie dies bei der in Zoom integrierten Aufzeichnungsfunktion der Fall ist.
Um die geltenden Vorschriften einzuhalten, holen Sie vor Beginn der Aufzeichnung die mündliche Zustimmung aller Teilnehmer ein. Weisen Sie deutlich darauf hin, dass die Besprechung aufgezeichnet wird, und erläutern Sie, wofür die Aufzeichnung verwendet wird. Diese Vorgehensweise schafft Vertrauen und hilft Ihnen, die gesetzlichen Anforderungen in den meisten Rechtsordnungen zu erfüllen.
So richten Sie OBS für die Aufzeichnung von Zoom-Meetings ein
Die erstmalige Einrichtung von OBS umfasst einige Details. Hier ist der schnellste Weg zu einer funktionierenden Konfiguration.
Schritt 1: OBS Studio herunterladen und installieren
Laden Sie die neueste Version von OBS Studio von der offizielle Website. Die Software ist für Windows, macOS und Linux verfügbar.
Führen Sie das Installationsprogramm aus und befolgen Sie die Anweisungen auf dem Bildschirm. Der Vorgang dauert einige Minuten.
- Standardeinstellungen: Halten Sie sich an die Standardeinstellungen, sofern Sie keine besonderen Anforderungen haben.
- Einbauort: Merken Sie sich, wo OBS installiert wird; diesen Ordner benötigen Sie möglicherweise später für Plugins oder benutzerdefinierte Konfigurationen.
Starten Sie nach der Installation OBS Studio. Wenn Sie aufgefordert werden, den Assistenten für die automatische Konfiguration auszuführen, wählen Sie “Nur für Aufnahmen optimieren”. Damit erhalten Sie eine brauchbare Grundeinstellung, die Sie anschließend in den Schritten 2 und 3 anpassen werden.
Schritt 2: Konfigurieren der Videoeinstellungen
Klicken Sie unten rechts im OBS-Hauptfenster auf “Einstellungen” und wechseln Sie dann zur Registerkarte “Video”.
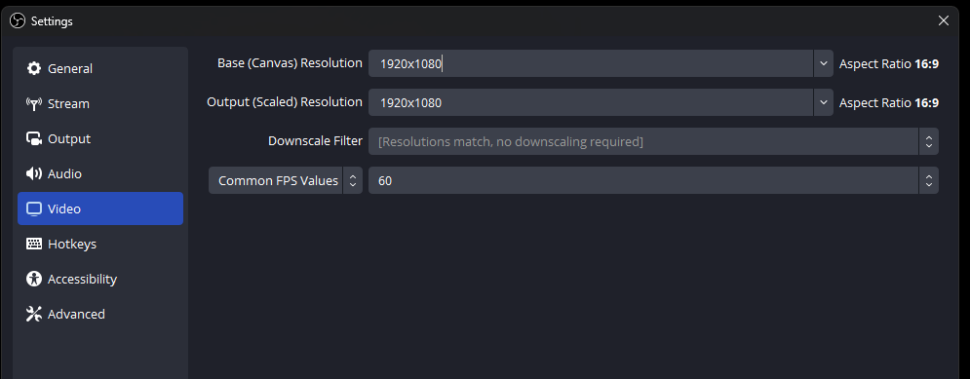
Basis (Canvas) Auflösung
Stellen Sie diesen Wert entsprechend der Auflösung Ihres Monitors ein. Wenn Sie sich nicht sicher sind, wählen Sie 1920×1080, die gängigste Option. Gängige Einstellungen:
- 1920×1080 (1080p)
- 1280×720 (720p)
- 2560×1440 (1440p)
Ausgang (skaliert) Auflösung
Dies bestimmt die endgültige Auflösung Ihres aufgezeichneten Videos. Behalten Sie für maximale Qualität die gleiche Auflösung wie die Arbeitsbereichsauflösung bei. Wenn Sie kleinere Dateigrößen benötigen, reduzieren Sie die Auflösung auf 1280×720.
Verkleinerungsfilter
Wenn sich Ihre Basis- und Ausgabeauflösung unterscheiden, stellen Sie den Downscale-Filter auf “Lanczos” ein, um ein optimales Verhältnis zwischen Qualität und Leistung zu erzielen. Diese Einstellung ist nicht verfügbar, wenn beide Auflösungen identisch sind.
Gemeinsame FPS-Werte
- 30 FPS: Standard für die meisten Aufnahmen; gutes Verhältnis zwischen Qualität und Dateigröße.
- 60 FPS: Flüssigere Bewegungen; besser geeignet für temporeiche Inhalte oder professionell gestaltete Präsentationen.
Klicken Sie auf “Übernehmen” und anschließend auf “OK”, um die Änderungen zu speichern.
Ausgabeformat: MKV vs. MP4
Bevor Sie die Einstellungen verlassen, wechseln Sie zur Registerkarte “Ausgabe” und überprüfen Sie Ihr Aufnahmeformat.
- MKV Dies ist die Standardeinstellung von OBS, da sie absturzsicher ist. Wenn OBS während der Aufnahme abstürzt, stellt MKV die Datei wieder her; MP4 hingegen nicht.
- MP4 ist besser kompatibel mit Videobearbeitungsprogrammen, YouTube und Sonix.
- Empfohlener Arbeitsablauf: Nehmen Sie die Aufzeichnung im MKV-Format auf und verwenden Sie anschließend das in OBS integrierte Remux-Tool (Datei > Aufzeichnungen remuxen), um die Datei ohne Neukodierung in MP4 zu konvertieren. So profitieren Sie von einer Absturzsicherheit während der Aufzeichnung und von Kompatibilität im Anschluss.
Schritt 3: Audio-Quellen einrichten
Für eine hohe Audioqualität sind in OBS zwei bestimmte Quellen erforderlich.
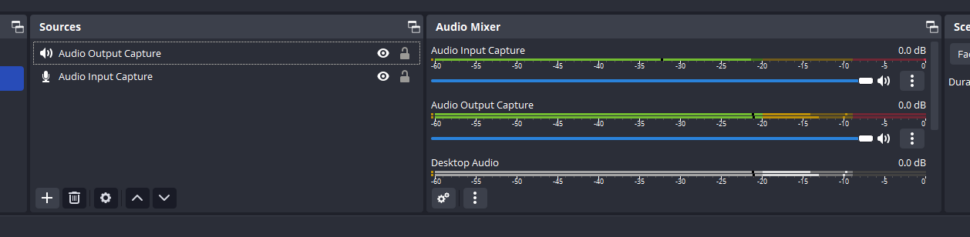
- Suchen Sie im OBS-Hauptfenster den Bereich “Audio-Mixer” unten in der Mitte.
- Klicken Sie im Feld “Quellen” auf die Schaltfläche “+” und fügen Sie “Audio-Eingabe” für Ihr Mikrofon hinzu.
- Fügen Sie “Audioausgabe-Aufzeichnung” für Ihren Systemton hinzu (dadurch wird der Ton des Zoom-Meetings aufgezeichnet).
- Benennen Sie jede Quelle aussagekräftig um, zum Beispiel “Mikrofon” und “Zoom-Audio”.”
- Stellen Sie die Lautstärkeregler so ein, dass die Pegel ausgewogen sind und es nicht zu Übersteuerungen (rot leuchtend) kommt.
- Um die Audioqualität zu verbessern, klicken Sie im Audio-Mixer mit der rechten Maustaste auf eine Quelle, wählen Sie “Filter” aus und fügen Sie je nach Bedarf eine Rauschunterdrückung oder eine Verstärkung hinzu.
Wichtig: Wenn Sie Ihr Mikrofon in Zoom stummschalten, zeichnet OBS Ihr Mikrofon weiterhin unabhängig davon auf. Um die Aufnahme Ihres Mikrofons durch OBS zu beenden, klicken Sie im OBS-Audio-Mixer auf das Lautsprechersymbol neben der Anzeige für die Audio-Eingangsaufnahme oder entfernen Sie die Quelle vollständig.
Schritt 4: Zoom Fenster Capture hinzufügen
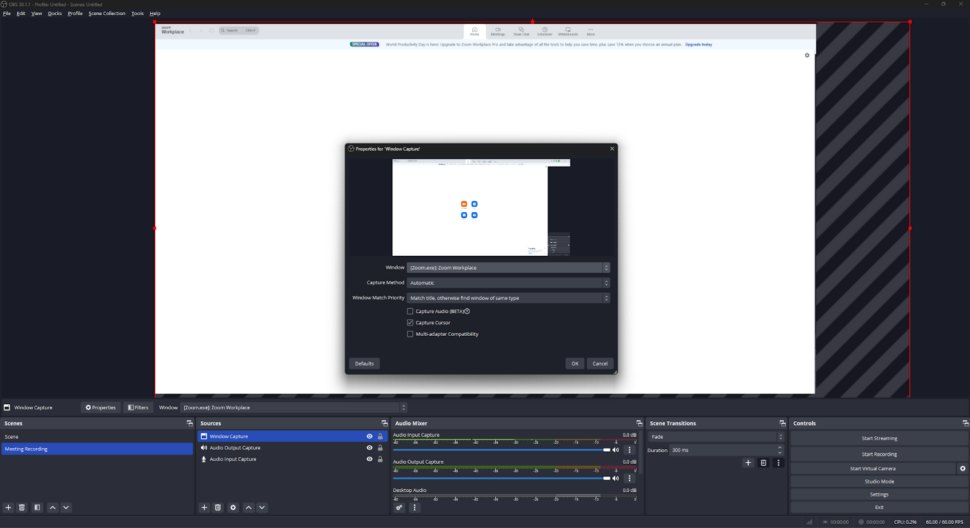
- Öffnen Sie Ihr Zoom-Meeting und ordnen Sie das Fenster wie gewünscht an.
- Klicken Sie in OBS auf die Schaltfläche “+” im Feld “Quellen”.
- Wählen Sie “Fensteraufnahme” aus.”
- Geben Sie den Namen der Quelle ein (z. B. “Zoom-Meeting”) und klicken Sie auf “OK”.”
- Wählen Sie im Fenster “Quelle erstellen/auswählen” das Zoom-Fenster aus der Dropdown-Liste “Fenster” aus.
- Klicken Sie auf “OK”, um die Quelle zu Ihrer Szene hinzuzufügen.
Tipps zur Aufzeichnung Ihres Zoom-Meetings:
- Das Zoom-Fenster muss während der Aufzeichnung sichtbar bleiben und darf nicht minimiert oder verdeckt werden.
- Wenn Sie mehrere Monitore verwenden, vergewissern Sie sich, dass OBS den richtigen Monitor erfasst.
- Fügen Sie weitere Quellen (Webcam, Präsentationsfolien) hinzu, indem Sie den oben beschriebenen Vorgang wiederholen.
Schritt 5: Szenenkomposition anpassen
Nachdem Sie Ihre Quellen hinzugefügt haben, ordnen Sie diese so an, dass ein übersichtliches, professionelles Layout entsteht.
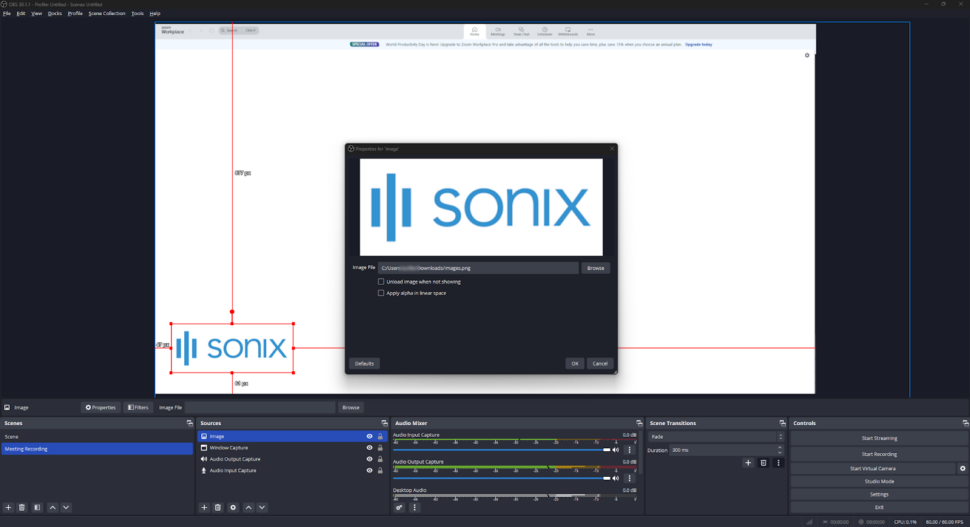
- Größe und Position der Quellen anpassen: Klicken Sie auf die Ränder der einzelnen Quellen im Vorschaubereich und ziehen Sie sie, um die Größe anzupassen. Ziehen Sie sie, um sie neu zu positionieren. Ein gängiges Layout sieht vor, dass die Webcam in einer Ecke und das Zoom-Fenster in der Mitte platziert wird.
- Quelleneigenschaften anpassen: Klicken Sie mit der rechten Maustaste auf eine Quelle im Feld “Quellen” und wählen Sie “Eigenschaften”, um auf Transparenz, Farbkorrektur und andere Einstellungen zuzugreifen.
- Szenenübergänge verwenden: Klicken Sie im Feld “Szenenübergänge” auf “+”, um fließende Übergänge zwischen den Szenen hinzuzufügen.
Hinzufügen einer Overlay-Ebene mit Markenelementen
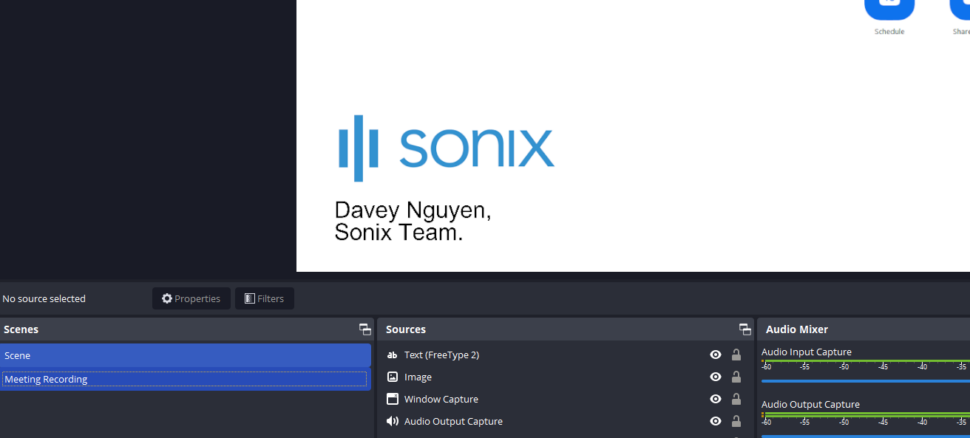
Um Ihrer Aufzeichnung ein Overlay mit Ihrem Logo hinzuzufügen, erstellen Sie ein Bild in einem beliebigen Design-Tool (z. B. Adobe Photoshop oder Canva), fügen Sie es anschließend in OBS als Bildquelle hinzu (Quellen > + > Bild) und positionieren Sie es in der Vorschau. OBS überlagert es automatisch über Ihr Zoom-Fenster.
Speichern und Verwalten von Szenen
Klicken Sie mit der rechten Maustaste in das Feld “Szenen” und wählen Sie “Szene speichern”, um Ihr Layout zu speichern. Erstellen Sie mehrere Szenen für unterschiedliche Aufnahmekonfigurationen. OBS merkt sich Ihre Einstellungen für den nächsten Start der App.
Verwendung der OBS-Virtual-Camera mit Zoom
Mit der OBS Virtual Camera können Sie Ihre gesamte OBS-Szene (einschließlich Overlays, mehrerer Quellen und benutzerdefinierter Layouts) als Kameraquelle in Zoom einbinden. Andere Teilnehmer sehen dann Ihre mit Ihrem Branding versehene OBS-Szene anstelle eines einfachen Webcam-Feeds.
So aktivieren Sie diese Funktion:
- Gehen Sie in OBS zu „Extras“ > „Virtuelle Kamera starten“.
- Öffnen Sie in Zoom die Videoeinstellungen > Kamera und wählen Sie “OBS Virtual Camera” aus dem Dropdown-Menü aus.
- Ihre OBS-Szene wird nun für alle Teilnehmer als Ihre Zoom-Kamera angezeigt.
Dies ist nützlich für Referenten, die Overlays mit ihrem Markenlogo oder Bild-in-Bild-Layouts wünschen, die für alle Teilnehmer der Besprechung sichtbar sind – nicht nur in der lokalen Aufzeichnung.
Aufzeichnung eines Zoom-Meetings mit OBS
Nachdem OBS nun konfiguriert ist, führen Sie die folgenden Schritte aus, um Ihr Meeting aufzuzeichnen.
- OBS Studio starten: Öffnen Sie OBS und vergewissern Sie sich, dass Ihre Szene mit der Zoom-Fensteraufnahme und allen anderen Quellen eingerichtet ist.
- Starten Sie Ihr Zoom-Meeting: Öffnen Sie Zoom und starten Sie das Meeting oder nehmen Sie daran teil. Lassen Sie das Zoom-Fenster auf dem Bildschirm sichtbar.
- Überprüfen Sie Ihre Audiopegel: Sprechen Sie vor der Aufnahme in Ihr Mikrofon und beobachten Sie die Anzeigen des Audiomixers. Wenn sich die Balken bewegen, wird Ton aufgenommen.
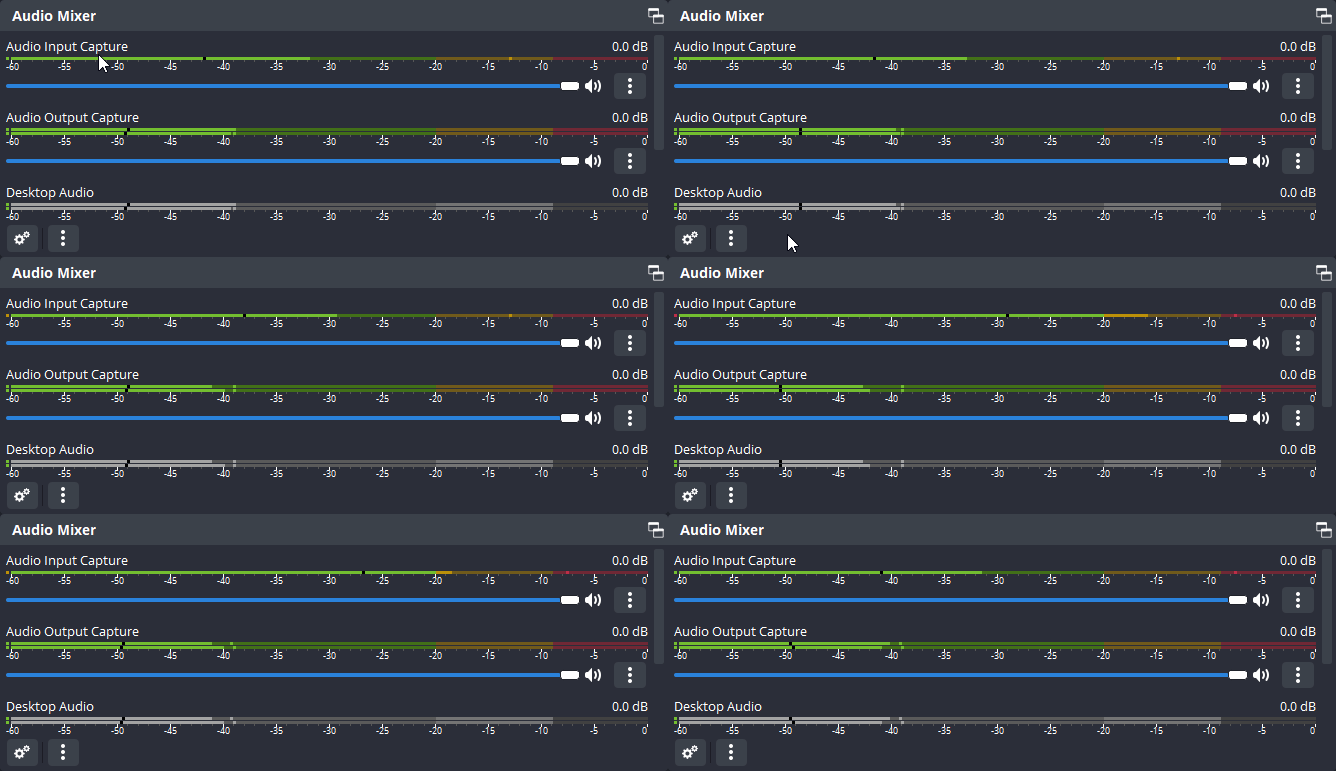
- Aufnahme starten: Klicken Sie im OBS-Bedienfeld auf “Aufnahme starten”. OBS zeichnet Ihr Zoom-Meeting auf, einschließlich aller Video- und Audioquellen.
- Wie gewohnt teilnehmen: OBS nimmt im Hintergrund auf. Konzentrieren Sie sich ganz auf Ihr Meeting.
- Aufnahme stoppen: Klicken Sie auf “Aufzeichnung beenden”, wenn die Besprechung endet. OBS speichert die Datei in dem von Ihnen angegebenen Ausgabeverzeichnis.
Fehlerbehebung bei häufigen Problemen bei OBS- und Zoom-Aufnahmen
Dies sind die häufigsten Probleme, auf die Nutzer nach der Einrichtung stoßen.
OBS nimmt Video auf, aber der Ton ist stumm
Ursache: Die Quelle „Audioausgabe“ fehlt, oder der Ton von Zoom wird an ein Gerät weitergeleitet, das von OBS nicht überwacht wird.
Korrektur: Fügen Sie in OBS eine Audioausgabe-Aufnahmequelle hinzu und stellen Sie diese auf dasselbe Wiedergabegerät ein, das Zoom verwendet. Vergewissern Sie sich, dass sich die Audioanzeige im OBS-Audiomixer während des Meetings bewegt.
OBS zeigt bei der Aufzeichnung von Zoom einen schwarzen Bildschirm oder ein eingefrorenes Bild an
Ursache: Unter Windows können hardwarebeschleunigte Anwendungen (einschließlich Zoom) die Fenstererfassung blockieren. Unter Linux wird dies durch eine Inkompatibilität zwischen Pipewire und Pulseaudio verursacht.
Behebung (Windows): Klicken Sie mit der rechten Maustaste auf die Quelle “Fensteraufnahme” > „Eigenschaften“ > aktivieren Sie „Transparenz zulassen“. Alternativ können Sie die Hardwarebeschleunigung in Zoom deaktivieren (Einstellungen > Video > Erweitert > deaktivieren Sie die Optionen für die Hardwarebeschleunigung). Wenn beides nicht funktioniert, wechseln Sie zu „Bildschirmaufnahme“.
Behebung (Linux): Wechseln Sie von „Bildschirmaufnahme (Pipewire)“ zu „Fensteraufnahme (Pipewire)“ und wählen Sie das Zoom-Fenster explizit aus der Dropdown-Liste aus.
Mein Mikrofon nimmt auch dann auf, wenn es in Zoom stummgeschaltet ist
Ursache: Die Stummschaltfunktion von Zoom schaltet lediglich Ihr Mikrofon innerhalb von Zoom stumm. OBS erfasst das Mikrofon unabhängig davon über seine eigene Audio-Eingangsquelle.
Korrektur: Klicken Sie auf das Lautsprechersymbol neben der Anzeige für die Audio-Eingabeerfassung im OBS-Audio-Mixer, um diese in OBS stummzuschalten, oder entfernen Sie die Quelle vor der Aufnahme vollständig.
Die Aufnahmedatei ist zu groß
Ursache: MKV-Dateien mit hoher Bitrate führen zu großen Dateien.
Korrektur: Ändern Sie in den OBS-Einstellungen unter „Ausgabe“ > „Aufnahme“ das Format auf MP4 und stellen Sie den Encoder auf x264 mit einem CRF-Wert von 23 ein, um ein gutes Verhältnis zwischen Qualität und Dateigröße zu erzielen. Alternativ können Sie den in Schritt 2 beschriebenen Arbeitsablauf unter „Datei“ > „Aufnahmen neu muxen“ verwenden.
OBS und Zoom-Audio sind nicht synchron
Ursache: Die Verzögerungen bei der Audio- und Videoverarbeitung variieren je nach Quelle.
Korrektur: Klicken Sie mit der rechten Maustaste auf die Audioquelle im Audio-Mixer > Filter > fügen Sie der Videoquelle einen “Video Delay (Async)”-Filter hinzu. Sie können auch das Feld “Sync Offset” in den erweiterten Audioeinstellungen verwenden, um die Spuren manuell abzustimmen.
Transkribieren Ihres aufgezeichneten Zoom-Meetings
Danach Aufzeichnung Ihres Zoom-Meetings, durch die Transkription wird der Inhalt durchsuchbar, teilbar und lässt sich leicht nachlesen.
Sonix ist das Beste Transkriptionssoftware für diesen Arbeitsablauf. Es bietet schnelle, genaue Transkription, unterstützt 53+ Sprachen, bietet Sicherheit auf Unternehmensniveau, und umfasst Kollaborationstools die es Teams erleichtern, gemeinsam an Transkripten zu arbeiten. Sonix generiert außerdem automatisierte Zusammenfassungen und automatische Untertitel direkt aus Ihrer Aufnahme.
1. Laden Sie Ihr Video auf Sonix hoch
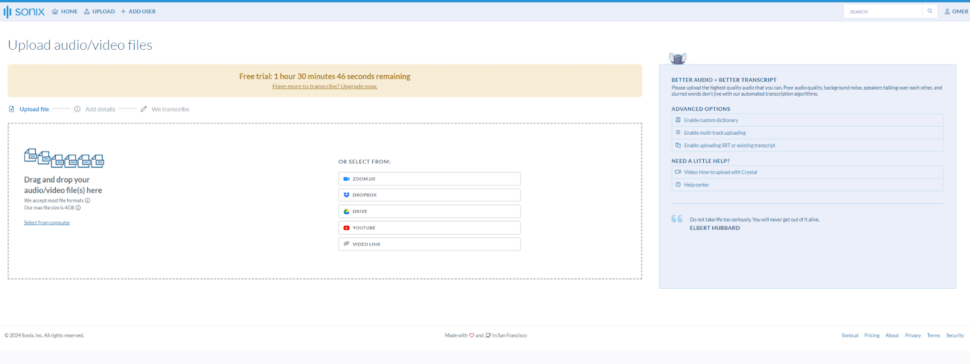
- Melden Sie sich an und gehen Sie zu der Sonix-Upload Seite.
- Ziehen Sie Ihre Aufnahme per Drag & Drop in das Feld und warten Sie, bis der Upload abgeschlossen ist.
- Wählen Sie bei Bedarf eine Sprache aus; Sonix erkennt die Sprache automatisch, wenn Sie dieses Feld leer lassen.
- Aktivieren Sie die Lautsprecherbeschriftung, wenn Sie Sonix verwenden möchten. AI-Analysefunktionen um die Beiträge jedes Teilnehmers zu erfassen und zu protokollieren.
2. Transkribieren Sie Ihre Datei
- Klicken Sie auf “Transkribieren”. Sonix beginnt sofort mit der Verarbeitung.
- Sie erhalten eine E-Mail-Benachrichtigung, sobald das Zeugnis vorliegt.
3. Bearbeiten und polieren Sie Ihr Zeugnis
- Überprüfen Sie den generierten Text auf Richtigkeit.
- Nutzen Sie den browserbasierten Editor von Sonix, um Korrekturen vorzunehmen, Satzzeichen hinzuzufügen oder den Text neu zu formatieren. Dank der Side-by-Side-Ansicht von Video und Transkript lässt sich der Inhalt leicht nachvollziehen.
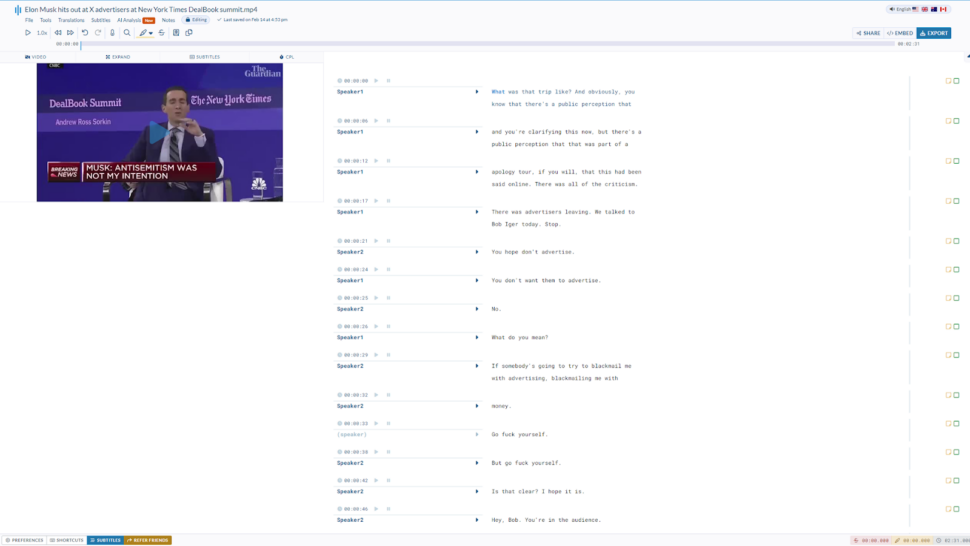
4. Exportieren und Weitergeben Ihrer Abschrift
- Exportieren Sie die Datei in Ihrem bevorzugten Format: TXT, DOC, PDF oder SRT.
- Wenn Sie Untertitel direkt in Ihr Video einbrennen möchten, ist auch das mit Sonix möglich. Beachten Sie jedoch, dass eingebrannte Untertitel dauerhaft sind; überprüfen Sie daher vor dem Export die Platzierung.
Transkribieren Ihrer aufgezeichneten Zoom-Meetings Mit Sonix lassen sich stundenlange Audioaufnahmen innerhalb weniger Minuten in ein durchsuchbares, bearbeitbares Dokument umwandeln.
Abschließende Überlegungen
Mit OBS haben Sie die volle Kontrolle darüber, wie Ihre Zoom-Meetings aufgezeichnet werden: bessere Qualität, mehr Flexibilität und keine Abhängigkeit von den Aufzeichnungsbeschränkungen von Zoom. Sobald Sie die Aufzeichnung haben, transkribieren Sie sie mit Sonix, damit jedes Meeting durchsuchbar und teilbar ist.
Testen Sie noch heute die kostenlose Sonix-Testversion und erhalten Sie 30 Minuten kostenlose Transkription. Keine Kreditkarte erforderlich.
Häufig gestellte Fragen
Kann man ein Zoom-Meeting mit OBS aufzeichnen, wenn man nicht der Gastgeber ist?
Ja. OBS zeichnet alles auf, was auf Ihrem Bildschirm zu sehen ist, unabhängig davon, welche Rolle Sie in der Besprechung einnehmen. Sie benötigen jedoch vor der Aufzeichnung die Erlaubnis des Gastgebers oder der Teilnehmer.
Zeichnet OBS Zoom-Meetings auf, ohne dass die anderen Teilnehmer davon erfahren?
OBS löst das Benachrichtigungsbanner von Zoom zur Aufzeichnung nicht aus. Die Teilnehmer sehen keine Meldung auf dem Bildschirm. Daher ist es besonders wichtig, vor Beginn der Aufzeichnung eine mündliche Einwilligung einzuholen – sowohl aus rechtlichen Gründen als auch im Sinne der Transparenz.
Warum ist in meiner OBS-Zoom-Aufnahme kein Ton zu hören?
Die häufigste Ursache ist eine fehlende Audio-Ausgabequelle. Fügen Sie in OBS eine solche hinzu, stellen Sie sie auf dasselbe Wiedergabegerät ein, das Zoom verwendet, und vergewissern Sie sich, dass sich die Anzeige im Audio-Mixer während des Meetings bewegt.
Was ist das beste Ausgabeformat für die Aufzeichnung von Zoom-Meetings in OBS?
Nimm im MKV-Format auf, um im Falle eines Absturzes auf Nummer sicher zu gehen, und verwende dann in OBS den Menüpunkt „Datei > Aufnahmen neu muxen“, um die Datei ohne Neukodierung in MP4 zu konvertieren. MP4 ist besser kompatibel mit Videobearbeitungsprogrammen, YouTube und Sonix.
Wie kann ich ein Zoom-Meeting ohne Erlaubnis aufzeichnen?
Das Aufzeichnen ohne Erlaubnis kann gegen Datenschutzgesetze oder die Wünsche des Gastgebers verstoßen. Holen Sie vor der Aufzeichnung eines Meetings stets die ausdrückliche Zustimmung ein.
Kann ich in OBS mehrere Audioquellen aufnehmen?
Ja. OBS nimmt mehrere Audioquellen gleichzeitig auf, darunter Ihr Mikrofon, den Systemton und den Ton des Zoom-Meetings. Jede Quelle wird im Audio-Mixer als eigene Spur angezeigt.
Wie kann ich ein Online-Meeting mit OBS aufzeichnen?
Befolgen Sie die fünf Schritte in dieser Anleitung: Installieren Sie OBS, konfigurieren Sie die Videoeinstellungen, fügen Sie Audioquellen hinzu, erfassen Sie das Meeting-Fenster und starten Sie die Aufzeichnung. Der gleiche Arbeitsablauf gilt für Zoom, Google Meet, Microsoft Teams und andere Konferenzplattformen.
Die weltweit genaueste KI-Transkription
Sonix transkribiert Ihre Audio- und Videodateien in Minutenschnelle - mit einer Genauigkeit, die Sie vergessen lässt, dass es sich um einen automatisierten Vorgang handelt.


 German
  English
  Spanish
  French
  Russian
  Portuguese
  Dutch
Dutch  Chinese
  Turkish
  Danish