Zoom meetings have become an integral part of modern communication, connecting people across the globe for work, education, and social interactions. As remote collaboration continues to grow, understanding how to create, manage, and schedule Zoom meetings is crucial to conducting your day-to-day meetings effectively.
In this article, you’ll learn the essentials of Zoom meetings, like creating an account, scheduling meetings, managing your virtual gatherings, and getting the most out of them.
What is a Zoom Meeting?
A Zoom Meeting is a virtual video conferencing session hosted on Zoom, one of the top video conferencing and webinar applications in the market. Zoom allows participants to connect remotely from various devices and locations. It enables real-time audio, video, screen sharing, and collaboration for seamless online meetings and discussions.
How to Create a Zoom Meeting in 5 Steps
Here’s how to create a Zoom meeting and invite people in just five steps.
Step 1: Sign Up for a Zoom Account
You’ll need to create an account to set up Zoom meetings.
- Go to the Zoom sign-up page.
- Enter your email address and follow the prompts to create your account. You can also sign up using your Google, Apple ID, or Facebook account.
- Once your account is created, download the Zoom desktop app for your computer or the mobile app for your smartphone or tablet. You could also use the in-browser site to join a meeting, but the standalone apps have more features and better UIs.
- Sign in to the app using your Zoom account credentials.
With your Zoom account set up and the app installed, you’re ready to start creating and hosting Zoom Meetings.
2. Understand the Zoom UI
Once signed in, you will have access to the main Zoom interface, where you can view your upcoming meetings, start new meetings, and adjust your settings.
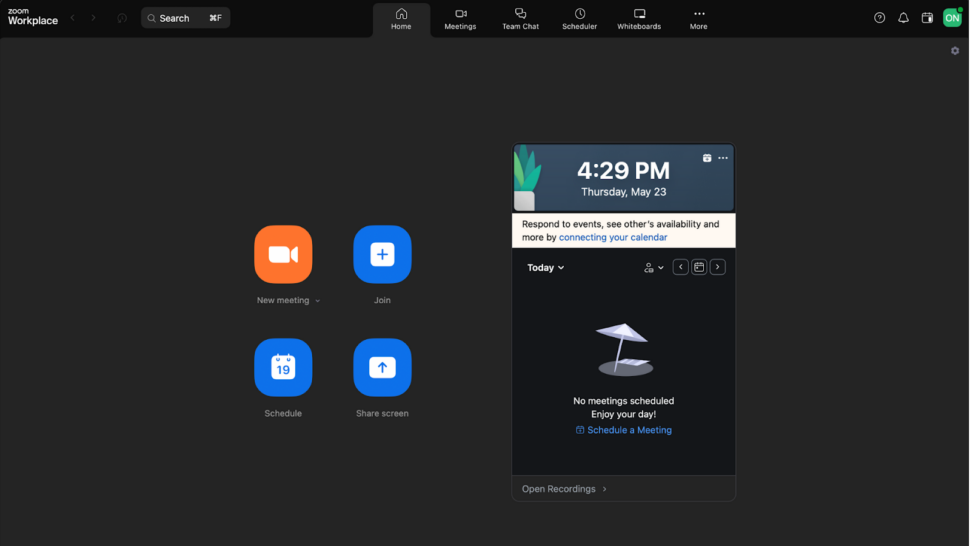
Take a moment to explore the Zoom app interface and familiarize yourself with its key features. The main screen displays the following options:
- New Meeting: Start an instant meeting.
- Join: Join a meeting using the provided meeting ID or link.
- Schedule: Create a new meeting and set its details, such as date, time, and duration.
- Share Screen: Share your device’s screen with other participants during a meeting.
On the right side of the screen, you’ll see your calendar with all the meetings scheduled for the day.
3. Customizing Your Zoom Meeting
Zoom offers a variety of customization options to tailor your meetings to your specific needs. These settings allow you to control various aspects of the meeting, such as participant permissions, recording options, and security measures.
To access these settings, click on your profile picture or initials on the top right of the screen and select the “Settings” tab.
Here are some key customization options to consider before you create your first meeting.
- Dual Monitors (Settings>General): If you’re running two monitors on your setup, it’s a good idea to turn this on. Doing so will put the shared screen and participant video feeds on different screens.
- Remind Me About Upcoming Events (Settings>General): By default, this feature is enabled and set to notify you 5 minutes before the meeting. It’s important to make sure that your device is allowing notifications from Zoom in order for it to work. Also, if 5 minutes is less time for you to set up for a meeting, you can change it to 10 minutes or more.
- Play Audio Chime on Hand Raise (Settings>General): If you’re going to be running meetings often, it’s important to have this feature enabled to make sure you don’t miss handraises and allow each member to contribute as well.
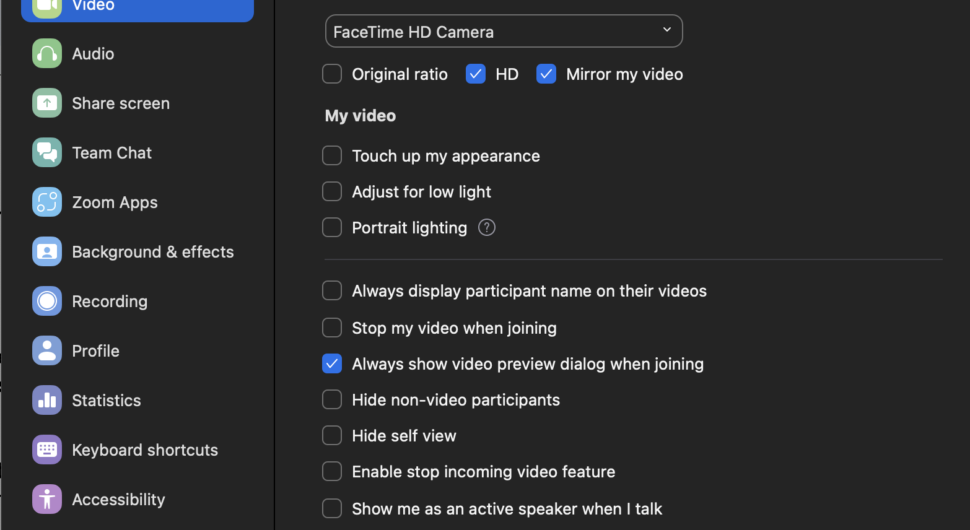
- Video Settings (Settings>Video): It’s always recommended to visit the video section of the settings before you join a meeting in a new location. Zoom gives you access to various video options to make sure you look your best in your meetings.
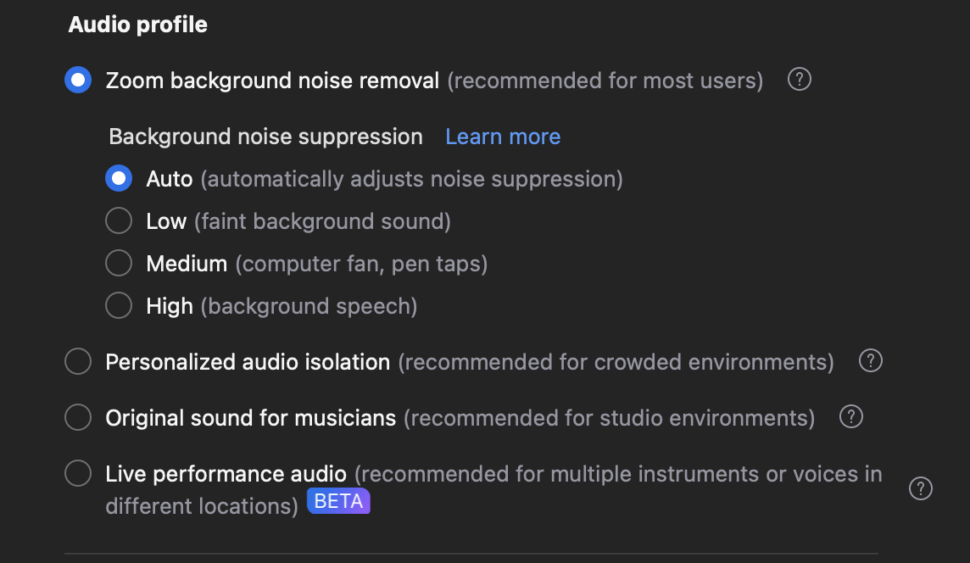
- Noise Removal (Settings>Audio): If you’re sitting in a public place like a cafe, turning on noise removal might be a good idea. Zoom’s noise removal feature isolates your voice to remove all background interruptions that would make your audio inaudible. By default, this feature is set to automatic. However, there are other settings as well that might make your audio quality much better.
- Keyboard Shortcuts (Settings>Keyboard Shortcuts): Keyboard shortcuts are a great way to maximize your productivity on Zoom. With the touch of two buttons, you can start/stop screen sharing, mute/unmute audio, temporarily unmute, start/stop recording, and more. You can also customize the hotkeys for these shortcuts.
4. Sending Zoom Meeting Invitations
Once you’ve scheduled your Zoom meeting, it’s time to invite participants.
Click the “Schedule” on the home and select the time, day, and other details for the meeting.
On the right side of the window, you can start adding in the email address or names of the people you want to invite to the meeting.
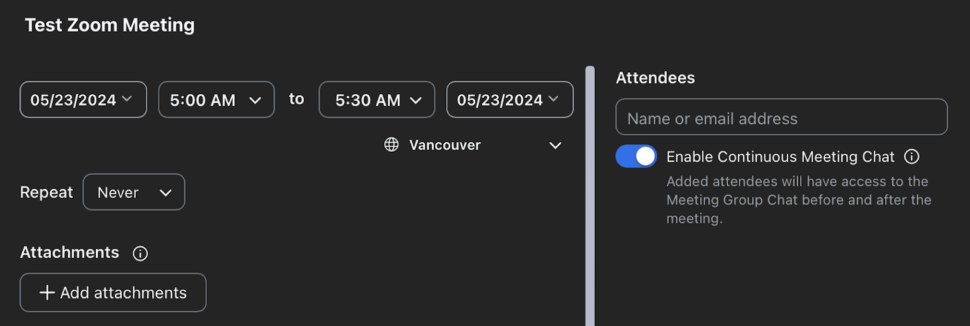
Alternatively, you can click the “Copy Invitation” to automatically copy the invitation to your clipboard.
Customizing Your Zoom Meeting Invitation
When copying or emailing the Zoom meeting invitation, you can customize the message to provide additional information or context for your participants. Consider including:
- Meeting Agenda: Give participants an overview of what will be discussed or covered during the meeting.
- Required Preparation: Let participants know if they need to prepare anything in advance, such as reviewing documents or bringing specific materials.
- Meeting Duration: Specify the expected duration of the meeting so participants can plan accordingly.
- Reminder to download Zoom: If you’re inviting participants who may be new to Zoom, remind them to download the Zoom app and sign up before the meeting.
5. Managing Zoom Meeting Participants
As the host, you have control over various aspects of participant management during the meeting. Here are some key features:
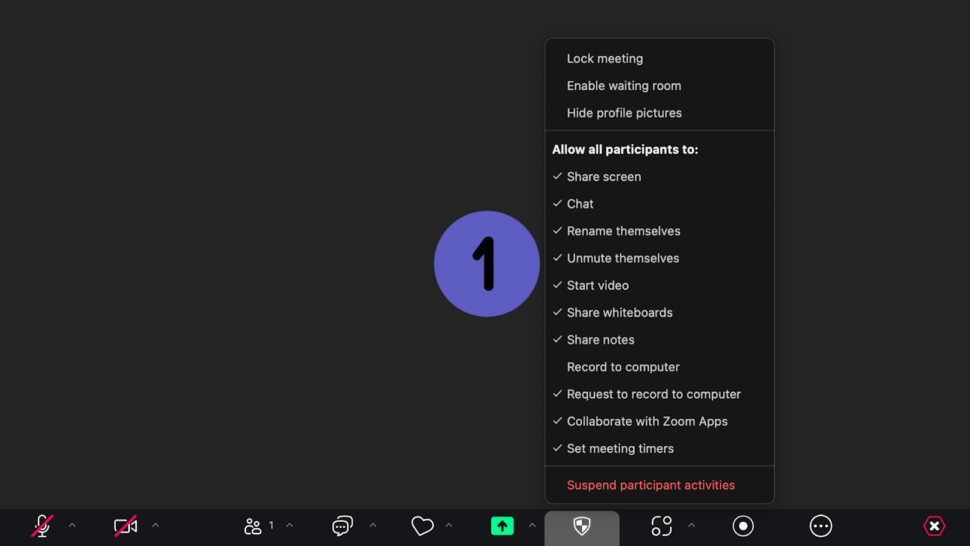
By default, you can set a few default settings to preemptively moderate the meeting. You can:
- Lock meetings
- Enable waiting room
- Hide profile pictures
Apart from that, you can allow or disallow participants to:
- Share screen
- Chat
- Rename and unmute themselves
- Start video
- Share whiteboards
- Share notes
- Record to computer
- Request to record
- Set meetings timers
Also, there are some other individual moderation tools you can use during the meeting.
Muting and Unmuting Participants
- Mute individual participants: Hover over a participant’s video and click the “Mute” button to mute their audio.
- Mute all participants: Click the “Participants” button in the meeting controls, then click “Mute All” to mute everyone’s audio at once.
- Allow participants to unmute: By default, participants can unmute themselves. To prevent this, click “More” next to “Mute All” and uncheck “Allow participants to unmute themselves.”
Controlling Participant Video
- Stop a participant’s video: Hover over a participant’s video and click the “Stop Video” button to turn off their camera.
- Request a participant to start video: Click the “Participants” button, hover over a participant’s name, and click “Ask to Start Video” to prompt them to turn on their camera.
Managing Disruptive Participants
- Remove a participant: Click the “Participants” button, hover over the disruptive participant’s name, and click “Remove.” They will be instantly removed from the meeting.
- Report a participant: If a participant violates Zoom’s terms of service or community standards, click “Participants,” hover over their name, and click “Report.” Fill out the report form and submit it to Zoom for review.

Final Thoughts
Zoom continues to be the standard for video conferencing tools in 2024. If you’re looking to integrate a meeting platform into your existing SOPs, Zoom is a great option.
If you want to make your Zoom Meetings even more effective, you can use Sonix’s transcript services to turn your Zoom Meeting audio and video into text transcripts.
It’s an extra step that can go a long way in maximizing the efficiency and usefulness of your online session. Transcribing your meetings with Sonix allows you to create an accurate reference point that you can double-check to keep your post-meeting actions 100% precise.
Start using Sonix and convert your Zoom meetings into searchable, actionable text today with our 30-minute free trial. No credit card required.
How to Create a Zoom Meeting: Frequently Asked Questions
How Do I Host a Zoom Meeting for the First Time?
To host a Zoom meeting for the first time, you need to sign up for a Zoom account. Once you have registered, download and install the Zoom application on your device. Open the app and sign in with your credentials. Click on the New Meeting button to start an instant meeting. You can then adjust your audio and video settings before starting the meeting. Ensure that your internet connection is stable to avoid any disruptions during the meeting.
How Do I Host a Zoom Meeting and Invite?
To host a Zoom meeting and invite participants, start by opening the Zoom application and signing in. Click on the Schedule button to set up a meeting for a future date and time. Fill in the meeting details such as the topic, date, time, and duration. Once the meeting is scheduled, Zoom will generate a meeting ID and invitation link. Copy the invitation link and send it to your participants via email, messaging apps, or any other communication platform you prefer. Participants can join the meeting by clicking on the link at the scheduled time.
How to Start a Zoom Meeting as a Host?
To start a Zoom meeting as a host, open the Zoom application and sign in. If you have scheduled the meeting in advance, click on the Meetings tab to find your scheduled meetings. Select the meeting you want to start and click the Start button. If you are starting an instant meeting, simply click the New Meeting button.
World's Most Accurate AI Transcription
Sonix transcribes your audio and video in minutes — with accuracy that'll make you forget it's automated.


