
When you watch a video with subtitles, the formatting and appearance might not be something you pay much attention to. But, the type of subtitles used can greatly affect your viewing experience.
There are two main types of subtitles: hard subs and soft subs. Knowing the difference is essential for selecting the best format for your needs, whether for personal enjoyment or professional use.
In this article, we’ll delve into what hard subs and soft subs are, their pros and cons, and their impact on accessibility. By the end, you’ll clearly understand which subtitle type is optimal for your video content based on what is best for the viewer’s experience and accessibility.
What are Hard Subs?
Hard subs are subtitles permanently embedded into the video file itself. When you watch a video with hard subs, the subtitles are always visible and cannot be turned off or removed. The text is “burned” into the video, becoming an integral part of the visual content. This means that no matter what device or media player you use, the subtitles will always appear, ensuring consistent accessibility and language support across all platforms.
What are Soft Subs?
On the other hand, soft subs are separate files that contain the subtitle text and timing information. These files are typically in formats such as SRT, VTT, or SSA. Soft subs are not embedded into the video but are instead loaded by the video player as a separate track. This allows viewers to toggle the subtitles on or off and even switch between different subtitle files if multiple languages are available.
Advantages and Disadvantages of Hard Subs
Hard subs offer certain advantages that make them a preferred choice in specific situations.
- Universality: Since hard subs are permanently embedded into the video file, they can be viewed on any device without the need for additional software or plugins. This ensures that your subtitles will be accessible to all viewers, regardless of their technical setup.
- Guaranteed Display: When you use hard subs, you can be confident that your intended subtitles will always be shown to the audience. This is particularly important for content creators who want to ensure that their message is conveyed accurately and consistently across all platforms.
- Professional Appearance: Hard subs often provide a cleaner and more professional look, as they are integrated seamlessly into the video. This can enhance the overall viewing experience and make the content appear more polished.
However, hard subs also come with some disadvantages. Here are a few reasons why hard subs shouldn’t always be the default option.
- Lack of Flexibility for Viewers: Since hard subs are permanently embedded, viewers cannot turn them off or change their appearance, such as font size or color. This can be frustrating for viewers who prefer to watch the video without subtitles or who find the default subtitle style difficult to read.
- Lack of Language Support: If you want to offer subtitles in multiple languages, you would need to create separate video files for each language, which can be time-consuming and costly. This limitation can restrict your ability to reach a wider, multilingual audience.
- Overlapping Content: If the hard subs are in one language and additional subtitles are needed in another language, such as Japanese, the subtitles will overlap. This can create a cluttered and confusing viewing experience, detracting from the overall quality and accessibility of the video.
- Editing Restrictions: If there are any errors in the subtitles or if updates are needed, you must edit and re-render the entire video. This process can be labor-intensive and may require significant resources to correct even minor mistakes.
Advantages and Disadvantages of Soft Subs
Soft subs provide several advantages that make them a popular choice for many content creators and viewers.
- Flexibility: Since soft subs are separate files, viewers can easily turn them on or off according to their preferences. This allows viewers to watch the video with or without subtitles, depending on their needs or language proficiency.
- Customizable Appearance: Viewers can often adjust the font size, color, and background to improve readability and suit their personal preferences. This level of customization enhances the viewing experience and makes your content more accessible to a diverse audience.
- Multi-language Support: With soft subs, you can provide subtitle files in various languages, allowing viewers to select their preferred language from a list. This multilingual support expands your reach and enables you to cater to a global audience without the need for separate video files.
However, soft subs also have some disadvantages to consider.
- Compatibility: Not all video players or devices support soft subs, which means that some viewers may not be able to access your subtitles. This can be particularly problematic if you’re targeting a wide range of devices or platforms.
- Separate Files: Soft subs are often stored as separate files from the video. This increases the risk of the subtitle file becoming misplaced or not being included when the video is shared, resulting in the video being viewed without subtitles.
- Variable Appearance: The appearance of soft subs can vary significantly depending on the media player and device settings. This can lead to inconsistencies in font size, style, and positioning, which may detract from the viewing experience. The same copy of subtitles may look good on your laptop but not on your phone.
How do Hard Subs and Soft Subs Impact Accessibility?
Subtitles play a significant role in making video content accessible to a wider audience, including viewers with hearing impairments or those who speak different languages. The choice between hard subs and soft subs can greatly impact the accessibility of your content.
Hard Subs and Accessibility
Hard subs are permanently embedded into the video file, which means they are always visible and cannot be turned off. This ensures that viewers with hearing impairments have consistent access to the subtitle text, regardless of the device or platform they are using. Hard subs provide a reliable way to convey important dialogue and sound effects to those who rely on subtitles to understand the content.
However, the lack of customization options with hard subs can be a drawback for some viewers. Since the subtitles are fixed, viewers cannot adjust the font size, color, or style to suit their individual needs. This can be particularly challenging for viewers with visual impairments who may require larger or higher-contrast text.
Soft Subs and Accessibility
Soft subs, on the other hand, offer more flexibility in terms of accessibility. Since soft subs are separate files, they can be customized to meet the specific needs of different viewers. This includes the ability to include SDH (Subtitles for the Deaf and Hard of Hearing) as a separate file, which provides additional information such as speaker identification and important sound effects.
With soft subs, viewers can choose to enable or disable the subtitles based on their preferences. They can also select from multiple subtitle files in different languages, making your content accessible to a global audience. Additionally, soft subs allow viewers to adjust the font size, color, and style of the subtitles, which can improve readability for those with visual impairments.
Accurate Text Timing and Formatting
Regardless of whether you choose hard subs or soft subs, accurate text timing and formatting are essential for a comprehensive viewing experience, especially for those who rely on subtitles to understand the content.
Subtitles should be synchronized with the spoken dialogue, appearing on the screen at the appropriate time and remaining visible long enough for viewers to read comfortably. Proper timing ensures that viewers can follow the conversation and understand the context of the scene.
Formatting also plays a crucial role in subtitle accessibility. Subtitles should be divided into easily readable lines, typically displaying no more than two lines of text at a time. The text should be clear and legible, with a font that is easy to read and a color that contrasts well with the background. Proper formatting enhances the overall viewing experience and makes your content more accessible to a diverse audience.
When creating subtitles, it is important to follow best practices for timing and formatting to ensure maximum accessibility. This includes adhering to industry standards for subtitle duration, line length, and character limits.
By properly formatting and timing your subtitles, you demonstrate a commitment to inclusivity and ensure that your content can be enjoyed by all viewers, regardless of their hearing ability or language preferences.
What Subtitle File Formats Are Used for Soft Subs?
Soft subs come in various file formats, each with its own characteristics and compatibility. Understanding these formats helps you choose the most suitable one for your video content and target audience. Let’s explore the most common subtitle file formats used for soft subs.
SubRip Subtitle (SRT)
SRT is the most widely used and supported subtitle format. It is a plain-text file that contains subtitle text and timing information. SRT files are easy to create, edit, and distribute, making them a popular choice for content creators.
SRT files are compatible with a wide range of video players and platforms, including VLC, Windows Media Player, and YouTube. They support basic text formatting, such as italics and bold, but do not offer advanced styling options.
WebVTT (VTT)
VTT, short for Web Video Text Tracks, is a text-based format designed specifically for web video. It is similar to SRT in terms of structure and simplicity but offers additional features and flexibility.
VTT files support more advanced text styling, such as font color, size, and background color. They also allow for the inclusion of metadata, such as speaker identification and chapter markers. VTT files are compatible with modern web browsers and are commonly used for online video platforms like HTML5 video players.
SubStation Alpha (SSA)
SSA is a more advanced subtitle format that offers extensive styling and positioning options. It allows for the creation of complex subtitles with multiple fonts, colors, and animations.
SSA files are often used for anime and other content that requires intricate subtitle styling. They are compatible with media players that support the format, such as VLC and MPC-HC. However, SSA files may not be as widely supported as SRT or VTT files.
When choosing a subtitle file format for your soft subs, consider the following factors:
- Compatibility: Ensure that the format you choose is compatible with your target video players and platforms. SRT and VTT are generally more widely supported than SSA.
- Styling Requirements: If you need advanced styling options, such as multiple fonts or colors, SSA may be the best choice. However, keep in mind that not all players support the full range of SSA features.
- Ease of Creation and Editing: SRT and VTT files are relatively simple to create and edit, even with basic text editors. SSA files may require specialized subtitle editing software.
- File Size: SRT and VTT files are typically smaller in size compared to SSA files, which can be a consideration for online video streaming.
Ultimately, the choice of subtitle file format depends on your specific needs and the requirements of your video content. SRT and VTT are versatile and widely supported, making them suitable for most scenarios. SSA is a good choice for content that demands advanced styling and positioning.
Tips for Choosing Between Hard Subs and Soft Subs

When deciding between hard subs and soft subs for your video content, there are several factors to consider to ensure the best viewing experience for your audience.
Consider Your Target Audience
Think about the specific needs and preferences of your target audience. If you’re creating content for a specific context, such as a film festival or a classroom setting, hard subs may be the most suitable choice. Hard subs guarantee that the subtitles will always be visible, ensuring that all viewers have access to the dialogue and important information.
On the other hand, if you’re aiming to reach a wider, more diverse audience, soft subs offer greater flexibility. Soft subs allow viewers to toggle the subtitles on or off and select their preferred language, making your content more accessible to a global audience with varying language proficiencies and viewing preferences.
Evaluate Compatibility and Accessibility Needs
Consider the compatibility of your chosen subtitle format with the platforms and devices your audience will be using. Ensure that the subtitle file format you select is supported by the video players and streaming services your viewers are likely to use. SRT and VTT files are widely compatible, while SSA files may have more limited support.
Accessibility is another important factor to evaluate. If you have viewers with hearing impairments or specific accessibility requirements, soft subs provide the flexibility to include SDH (Subtitles for the Deaf and Hard of Hearing) and allow for customization of font size, color, and style to enhance readability.
Make Subtitles Bigger on YouTube if Using Soft Subs
If you’re using soft subs on YouTube, you can easily adjust the subtitle size to improve readability for your viewers. YouTube’s built-in subtitle settings allow viewers to increase the font size of soft subs to their preferred level. This feature is particularly helpful for viewers with visual impairments or those watching on smaller screens.
To make subtitles bigger on YouTube, viewers can click on the “Settings” icon (gear) in the video player and select “Subtitles/CC.” From there, they can choose “Options” and adjust the font size using the slider. This customization option enhances the accessibility of your content and ensures a more comfortable viewing experience for your audience.
When creating soft subs for YouTube, keep in mind that the platform supports various subtitle file formats, including SRT, VTT, and SBV. You can upload your subtitle files directly to your YouTube videos or use YouTube’s built-in subtitle editor to create and sync subtitles within the platform itself.
By providing the option to make subtitles bigger on YouTube through soft subs, you empower your viewers to tailor their viewing experience to their needs, making your content more inclusive and accessible to a wider audience.
What is the Best Way to Add Subtitles to Your Videos?
When it comes to adding subtitles to your videos, you have several options available. You can choose to manually create subtitles using a text editor and then synchronize them with your video using a subtitle editor. This process can be time-consuming and requires a good understanding of subtitle formatting and timing.
If you’re looking to speed up subtitling for both hard sub and soft sub use cases, Sonix can be an impeccable tool to save you hours of work. Sonix has features to add both hard subs and soft subs to your video content. Here’s how you can make your content more accessible in just a few minutes.
How to Add Hard Subs with Sonix
Creating hard subs with Sonix is a straightforward process. Follow these steps to add permanent subtitles to your videos:
Step 1: Log In
- Begin by logging into your Sonix account. If you don’t have an account, you’ll need to sign up for one.
- Once logged in, you will be directed to the dashboard where you can manage your video projects.
Step 2: Upload the Video
- Click on the “Upload” button located on the dashboard.
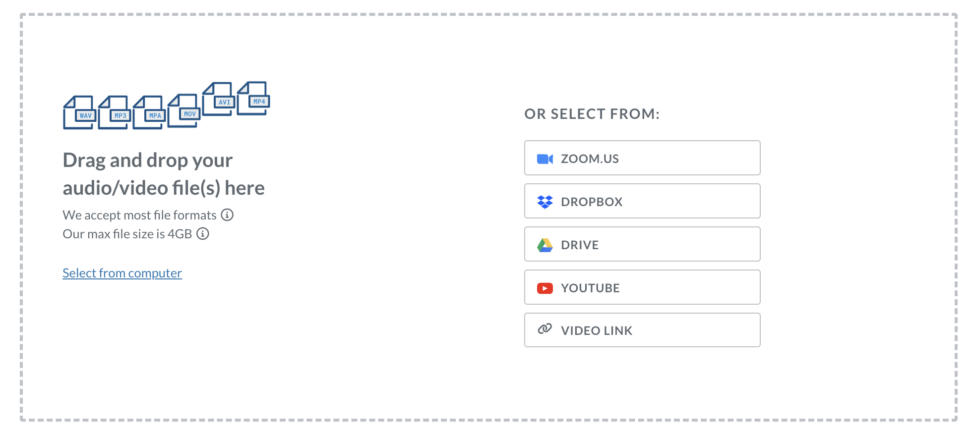
- You can upload a video directly from your device. Alternatively, Sonix also supports Zoom, Dropbox, Drive, and YouTube links.
- In the next stop, Sonix is going to ask for the language of the video. If you leave this empty, Sonix will auto-detect the language and transcribe accordingly.
- Confirm the upload, and Sonix will begin processing the video.
Step 3: Transcribe the Video
- Once you click “transcribe,” Sonix’s AI is going to begin processing and transcribing the file.
- The duration of this process will depend on the length and quality of your video. You can monitor the progress on your dashboard.
- Once the transcription is finished, you will receive a notification on your registered email.
Step 4: Review and Edit the Transcription
- Once the transcription is finished, go ahead and proofread it for any errors. Although Sonix provides highly accurate transcriptions, minor mistakes can occur. Since hard subs are permanent, it’s important that you remove any abnormalities before you start burning the subs into the video.
Step 5: Generate Video with Hard Subs
- After confirming the accuracy of the transcription, go to the “Subtitles” section in the Sonix interface. This is where you can customize the appearance and timing of your subtitles.
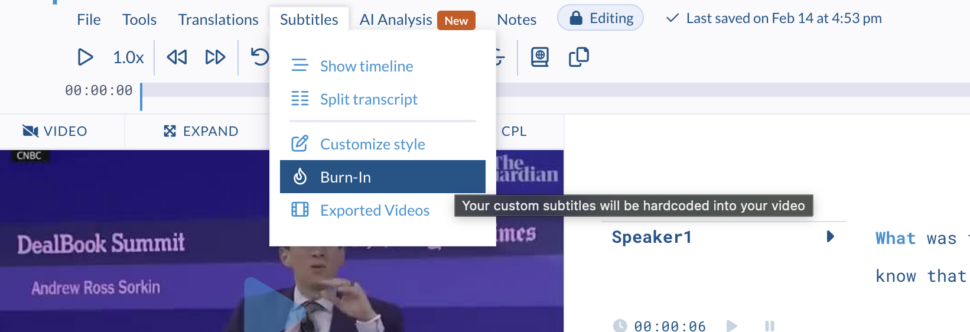
- In the Subtitles section, choose the “Burn In” option. This feature allows you to embed the subtitles directly into the video, making them a permanent part of the visual content.
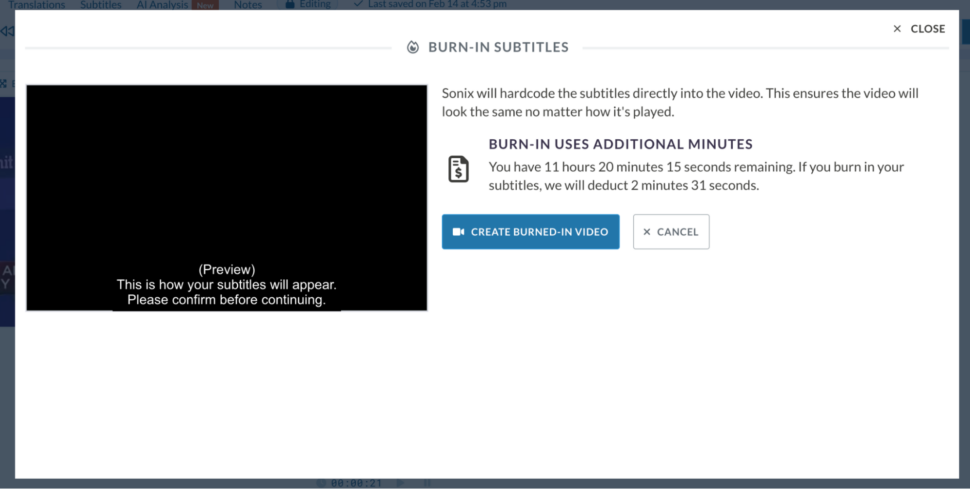
- Click on “Start Burn In” to embed the subtitles into your video.
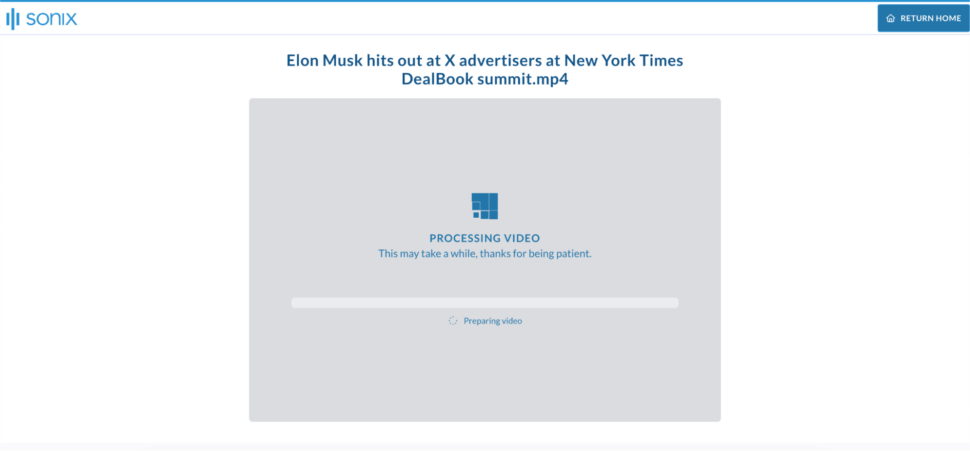
Step 6: Download the Video
- Once the burn-in process is complete, you’ll get the option to either download the video or get a link to the video on Sonix servers.
How to Add Soft Subs with Sonix
The process for adding hard subs and soft subs is identical up until step 4 of our guide mentioned above. We’ll walk you through the rest of the process down below.
Step 5: Export the Subtitles
- Once you are satisfied with the transcription, navigate to the “Subtitles” section. Click on the “Export” button located at the top left.
- You will be prompted to choose the format for your subtitles. While SRT is a common choice, Sonix also supports other formats such as VTT, TTML, and more.
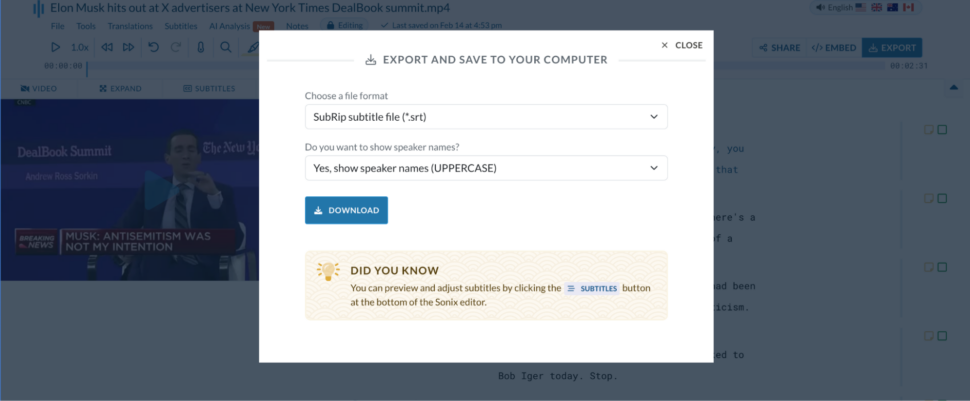
- Additionally, you can decide whether to include speaker names in the subtitles, allowing for greater customization based on your needs.
Step 6: Download the Subtitles
- After selecting the desired options, complete the export process. You will now have a soft subtitle file (SRT) that can be used with your video. These soft subs can be turned on or off by viewers, providing flexibility and accessibility.
- However, since these will be present in a separate file, make sure you send the subtitle file along with the video.
- It’s also a good practice to rename the subtitle file to the same name as the video file. If you do that, most media players will automatically import subtitle files for your users.
Hard Subs vs Soft Subs – Final Verdict
As one of the top transcription and subtitling tools in the market, Sonix is the ultimate solution for creating both soft and hard subtitles. With 99% accuracy and fast processing, Sonix ensures your subtitles are perfectly synced to spoken words, delivering seamless integration. With language support for over 49+ languages, Sonix helps make your content accessible to a global audience.
For hard subs, Sonix can burn subtitles directly into your video, guaranteeing consistent visibility across all platforms. If you prefer soft subs, Sonix offers easy export options in DOCX, SRT, VTT, PDF, TTML, and TXT formats.
Beyond its high accuracy and speed, Sonix is also affordable, making professional-quality subtitles accessible to everyone. Whether you’re a content creator, educator, or business professional, Sonix provides the tools you need to enhance your video’s reach and accessibility.
Sonix can streamline your subtitling process with accurate, automatic transcription and multiple-format support. Try Sonix’s free trial today and get 30 minutes of free transcription—no credit card required. Sign up here.
Hard Sub vs Soft Sub: Frequently Asked Questions
What Are the Most Common File Formats for Soft Subs?
The most common file formats for soft subs include SubRip Subtitle (SRT), WebVTT (Web Video Text Tracks), and SubStation Alpha (SSA), along with Advanced SubStation Alpha (ASS). SRT is a plain-text format containing subtitle text and timing information, which is widely supported and easy to create and edit. WebVTT is a text-based format designed for web video, similar to SRT, but offering additional styling and positioning options. SSA and ASS formats allow for more advanced styling and positioning of subtitles, including font styles, colors, and animations.
Can I Convert Hard Subs to Soft Subs?
Converting hard subs to soft subs is possible but can be a time-consuming process. It involves using optical character recognition (OCR) software to extract the subtitle text from the video frames and then creating a separate subtitle file with the extracted text and timing information. However, the accuracy of the conversion depends on the quality of the video and the clarity of the hard subs.
How Do I Add Soft Subs to My Videos?
To add soft subs to your videos, you’ll need to create a separate subtitle file in a supported format (e.g., SRT, WebVTT, SSA) and ensure that the file is properly timed and formatted. Most video editing software and online video platforms provide options to import and synchronize subtitle files with your video. Some platforms, like YouTube, also offer tools to create and edit subtitles directly within their interface.
Can I Use Soft Subs for Live Streaming?
Yes, you can use soft subs for live streaming. Many live streaming platforms support the inclusion of subtitle files during the streaming process. You’ll need to prepare the subtitle file in advance and ensure that it is properly synchronized with the live video. Some platforms also offer real-time captioning services that generate subtitles on the fly using speech recognition technology.
World's Most Accurate AI Transcription
Sonix transcribes your audio and video in minutes — with accuracy that'll make you forget it's automated.
